Kustomize is a configuration management tool for Kubernetes that allows users to customize application manifests without modifying the original YAML files, in this post I will explore Kustomize with overlays, bases, and transformers, then create simple kustomization.yaml files for different environments using Zackblog, then to practice using Kustomize’s built-in resources like configMapGenerator and secretGenerator.
Let’s take Zackblog k8s deployment manifest as an example and convert it into a Kustomize setup. We will start by organizing the files and gradually exploring key Kustomize features.
Set Up Kustomize Folder Structure
The base directory contains the common configuration. The overlays directories are for environment-specific customizations (e.g., dev and prod).
mkdir -p zackblog/base
mkdir -p zackblog/overlays/dev
mkdir -p zackblog/overlays/prod
Create the Base Kustomization
Move the original zackblog.yaml manifest to the base directory and split it into separate files for the deployment.yaml and service.yaml, then create a kustomization.yaml file in the base directory to manage these resources:
# zackblog/base/deployment.yaml
apiVersion: apps/v1
kind: Deployment
metadata:
  name: zackweb
  labels:
    app: zackweb
spec:
  replicas: 1
  selector:
    matchLabels:
      app: zackweb
  template:
    metadata:
      labels:
        app: zackweb
    spec:
      containers:
      - name: zackweb
        image: zackz001/gitops-jekyll:latest
        ports:
        - containerPort: 80

# zackblog/base/service.yaml
apiVersion: v1
kind: Service
metadata:
  name: zackweb-service
spec:
  selector:
    app: zackweb
  ports:
  - protocol: TCP
    port: 80
    targetPort: 80
  type: LoadBalancer

# zackblog/base/kustomization.yaml
resources:
  - deployment.yaml
  - service.yaml
Create Environment Overlays
In Kustomize, we create environment-specific overlays by overriding or patching the base configuration.
Dev Overlay: In the dev directory, create a kustomization.yaml file to customize the base configuration for development, then create a patch file patch.yaml to modify the replicas for the dev environment.
mkdir -p zackblog/overlays/dev/
mkdir -p zackblog/overlays/prod

# zackblog/overlays/dev/kustomization.yaml
resources:
  - ../../base

patchesStrategicMerge:
  - patch.yaml

commonLabels:
  environment: dev
# zackblog/overlays/dev/patch.yaml
apiVersion: apps/v1
kind: Deployment
metadata:
  name: zackweb
spec:
  replicas: 2  # Increase replica count in dev
Similarly, for production, create another kustomization.yaml and patch.yaml in the prod directory and set replicas to 4:
# zackblog/overlays/prod/kustomization.yaml
resources:
  - ../../base

patchesStrategicMerge:
  - patch.yaml

commonLabels:
  environment: prod
# zackblog/overlays/prod/patch.yaml
apiVersion: apps/v1
kind: Deployment
metadata:
  name: zackweb
spec:
  replicas: 5  # Scale to 5 replicas in prod
The final Kustomize Folder tree
The final Kustomize Folder structure looks like this, then we go and apply both dev and prod deployments into 2 namespaces using Kustomize environment overlays.
/zackblog# tree
.
├── base
│   ├── deployment.yaml
│   ├── kustomization.yaml
│   └── service.yaml
└── overlays
    ├── dev
    │   ├── kustomization.yaml
    │   └── patch.yaml
    └── prod
        ├── kustomization.yaml
        └── patch.yaml

kubectl create namespace zackblog-dev
kubectl create namespace zackblog-prod
namespace/zackblog-dev created
namespace/zackblog-prod created

kubectl apply -k ./zackblog/overlays/dev
service/zackweb-service created
deployment.apps/zackweb created

kubectl apply -k ./zackblog/overlays/prod
service/zackweb-service created
deployment.apps/zackweb created

root@asb:~/kustomizahelm/kustomize-z# kubectl get deployment zackweb -n zackblog-dev --show-labels
NAME      READY   UP-TO-DATE   AVAILABLE   AGE     LABELS
zackweb   2/2     2            2           3m20s   app=zackweb,environment=dev
root@asb:~/kustomizahelm/kustomize-z# kubectl get deployment zackweb -n zackblog-prod --show-labels
NAME      READY   UP-TO-DATE   AVAILABLE   AGE     LABELS
zackweb   4/4     4            4           2m47s   app=zackweb,environment=prod
Generate ConfigMaps and Secrets dynamically without manually creating YAML files
Here we will add a ConfigMap by updating the Base kustomization.yaml, then update deployment.yaml to merge and use the ConfigMap:
# zackblog/base/kustomization.yaml
resources:
  - deployment.yaml
  - service.yaml

configMapGenerator:
  - name: zackweb-config
    literals:
      - LOG_LEVEL=debug

# zackblog/base/deployment.yaml
spec:
  containers:
  - name: zackweb
    image: zackz001/gitops-jekyll:latest
    ports:
    - containerPort: 80
    envFrom:   # add configmap
      - configMapRef:
          name: zackweb-config

# zackblog/overlays/dev/kustomization.yaml
configMapGenerator:
  - name: zackweb-config
    behavior: merge  # Merge with the base ConfigMap
    literals:
      - LOG_LEVEL=debug  # Dev-specific log level

# zackblog/overlays/prod/kustomization.yaml
configMapGenerator:
  - name: zackweb-config
    behavior: merge  # Merge with the base ConfigMap
    literals:
      - LOG_LEVEL=info  # Prod-specific log level
root@asb:~/kustomizahelm/kustomize-z# kubectl apply -k zackblog/base
configmap/zackweb-config-47668c6k28 created
service/zackweb-service created
deployment.apps/zackweb created

root@asb:~/kustomizahelm/kustomize-z# kubectl apply -k zackblog/overlays/dev
configmap/zackweb-config-hf678c7m2b created
service/zackweb-service unchanged
deployment.apps/zackweb configured

root@asb:~/kustomizahelm/kustomize-z# kubectl apply -k zackblog/overlays/prod
configmap/zackweb-config-hf678c7m2b created
service/zackweb-service unchanged
deployment.apps/zackweb configured
Using Transformers for Advanced Customizations
Next, we will create a Transformer File to add Resource Limits for deployment in dev
# zackblog/overlays/dev/resource-limits.yaml
apiVersion: builtin
kind: PatchTransformer
metadata:
  name: add-resource-limits
patch: |
  - op: add
    path: /spec/template/spec/containers/0/resources
    value:
      limits:
        cpu: "500m"
        memory: "256Mi"
      requests:
        cpu: "250m"
        memory: "128Mi"
target:
  kind: Deployment
  name: zackweb

# zackblog/overlays/dev/kustomization.yaml
namespace: zackblog-dev

transformers:
  - resource-limits.yaml
root@asb:~/kustomizahelm/kustomize-z# kubectl apply -k zackblog/overlays/dev
configmap/zackweb-config-hf678c7m2b unchanged
service/zackweb-service unchanged
deployment.apps/zackweb configured

root@asb:~/kustomizahelm/kustomize-z# kubectl describe deployments.apps -n zackblog-dev

Pod Template:
  Labels:  app=zackweb
          environment=dev
  Containers:
    zackweb:
      Image:      zackz001/gitops-jekyll:latest
      Port:       80/TCP
      Host Port:  0/TCP
      Limits:
        cpu:     500m
        memory:  256Mi
      Requests:
        cpu:     250m
        memory:  128Mi
      Environment Variables from:
        zackweb-config-hf678c7m2b  ConfigMap  Optional: false
Override container image tags for different environments.
Lastly, we can update image tags in Dev to use zackz001/gitops-jekyll:v222 by updating overlay kustomization.yaml
# zackblog/overlays/dev/kustomization.yaml
namespace: zackblog-dev

images:
  - name: zackz001/gitops-jekyll
    newTag: dev

root@asb:~/kustomizahelm/kustomize-z# kubectl describe deployments.apps -n zackblog-dev | grep Image
Image:      zackz001/gitops-jekyll:v222
Summary about Kustomize
We had done the following practice using Kustomize:
- Namespace Isolation: Use separate namespaces (zackblog-dev and zackblog-prod) to isolate environments.
- Environment-Specific Customizations: Utilize overlays to manage environment-specific configurations, such as replica counts, resource limits, and image tags.
- Maintainable Structure: Keep a clear base and overlay structure to manage configurations efficiently.
- Leverage Kustomize Features: Explore generators, transformers, and image overrides to maximize Kustomize’s capabilities.
- Version Control: Keep Kustomize configurations under version control to track changes and collaborate effectively.
Next stage I want to explore:
- Strategic Merge vs. JSON Patches: Understand the differences and use cases for each patch type.
- Custom Transformers: Create custom transformers for complex modifications.
- Integration with GitOps Tools: Integrate Kustomize with ArgoCD or Flux for automated, Git-driven deployments.
- Managing Secrets Securely: Use tools like sealed-secrets or SOPS with Kustomize to manage sensitive information.
About Helm
Helm is another popular package manager for Kubernetes application deployment, not new to me as I had tried many charts previously with Kafka, and Redis helm charts installation, today I am going to explore how to build my helm chart for this zack blog, and deep dive into the chart development for advanced templating, together with helm release management and version control, finally integrate my chart with CI/CD for GitOps.
Common Helm command
helm list -A# list releases across all namespaceshelm pullbitnami/postgresql-ha –untar # untar the chart after pull online charthelm repo addbitnami https://charts.bitnami.com/bitnami # add a repohelm createzackblog-helm # create a new charthelm installzackblog-helm ~/zackblog-helm -n NAMESPACE -f dev-values.yaml # define ns and override with a new value filehelm upgradezackblog-helm ~/zackblog-helm –set image.repository= –set image.tag= # –set to upgrade chart with override a new valuehelm lint~/zackblog-helm # lint syntaxhelm rollbackzackblog-helm 2 # rollback to revision 2 of a releasehelm uninstallzackblog-helm -n Production # uninstall a chart from a ns
Start with own chart
- create a new helm chart
[root@freeipa-server ~]# helm create zackblog-helm
Creating zackblog-helm

# modify values.yaml
[root@freeipa-server zackblog]# vim values.yaml

replicaCount: 3

image:
  repository: zackz001/gitops-jekyll
  pullPolicy: IfNotPresent
  # Overrides the image tag.
  tag: "latest"

service:
  type: NodePort
  port: 80
- Lint chart syntax before install
# lint syntax
[root@freeipa-server ~]# helm lint zackblog-helm/
==> Linting zackblog-helm/
[INFO] Chart.yaml: icon is recommended

1 chart(s) linted, 0 chart(s) failed

# install own chart

[root@freeipa-server ~]# helm install zackblog-helm zackblog-helm
NAME: zackblog-helm
LAST DEPLOYED: Mon May 13 21:27:14 2024
NAMESPACE: default
STATUS: deployed
REVISION: 1
NOTES:
1. Get the application URL by running these commands:
export NODE_PORT=$(kubectl get --namespace default -o jsonpath="{.spec.ports[0].nodePort}" services zackblog-helm)
export NODE_IP=$(kubectl get nodes --namespace default -o jsonpath="{.items[0].status.addresses[0].address}")
echo http://$NODE_IP:$NODE_PORT
- Customize value.yaml by changing replica and image tag
# modify value.yaml to scale down and change image to v138
[root@freeipa-server ~]# vim zackblog-helm/values.yaml
replicaCount: 1

image:
  repository: zackz001/gitops-jekyll
  pullPolicy: IfNotPresent
  # Overrides the image tag.
  tag: "v139"
- Override values.yaml by -f and deploy the same chart to different environments
# create a dev ns then deploy and override with dev-values.yaml
[root@freeipa-server ~]# vim zackblog-helm/dev-values.yaml
image:
  repository: zackz001/gitops-jekyll
  tag: v140
replicaCount: 2
service:
  type: NodePort
  port: 80

[root@freeipa-server ~]# kubectl create ns dev
namespace/dev created
[root@freeipa-server ~]# helm install dev-zackblog-helm zackblog-helm -f zackblog-helm/dev-values.yaml -n dev
NAME: dev-zackblog-helm
LAST DEPLOYED: Mon May 13 21:36:39 2024
NAMESPACE: dev
STATUS: deployed
REVISION: 1
Advanced templating to add PVC into chart
# add templates/pvc.yaml
[root@freeipa-server ~]# vim zackblog-helm/templates/pvc.yaml
apiVersion: v1
kind: PersistentVolumeClaim
metadata:
  name: longhron-pvc
spec:
  accessModes:
  - ReadWriteOnce
  storageClassName: longhorn
  resources:
    requests:
      storage: 1Gi

# add pvc in values.yaml
[root@freeipa-server ~]# vim zackblog-helm/values.yaml
pvc:
  enabled: true
  templateFiles:
  - pvc.yaml

# add persistentVolumeClaim in templates/deployment.yaml
[root@freeipa-server ~]# vim zackblog-helm/templates/deployment.yaml
...
volumes:
  - name: data
    persistentVolumeClaim:
      claimName: longhron-pvc
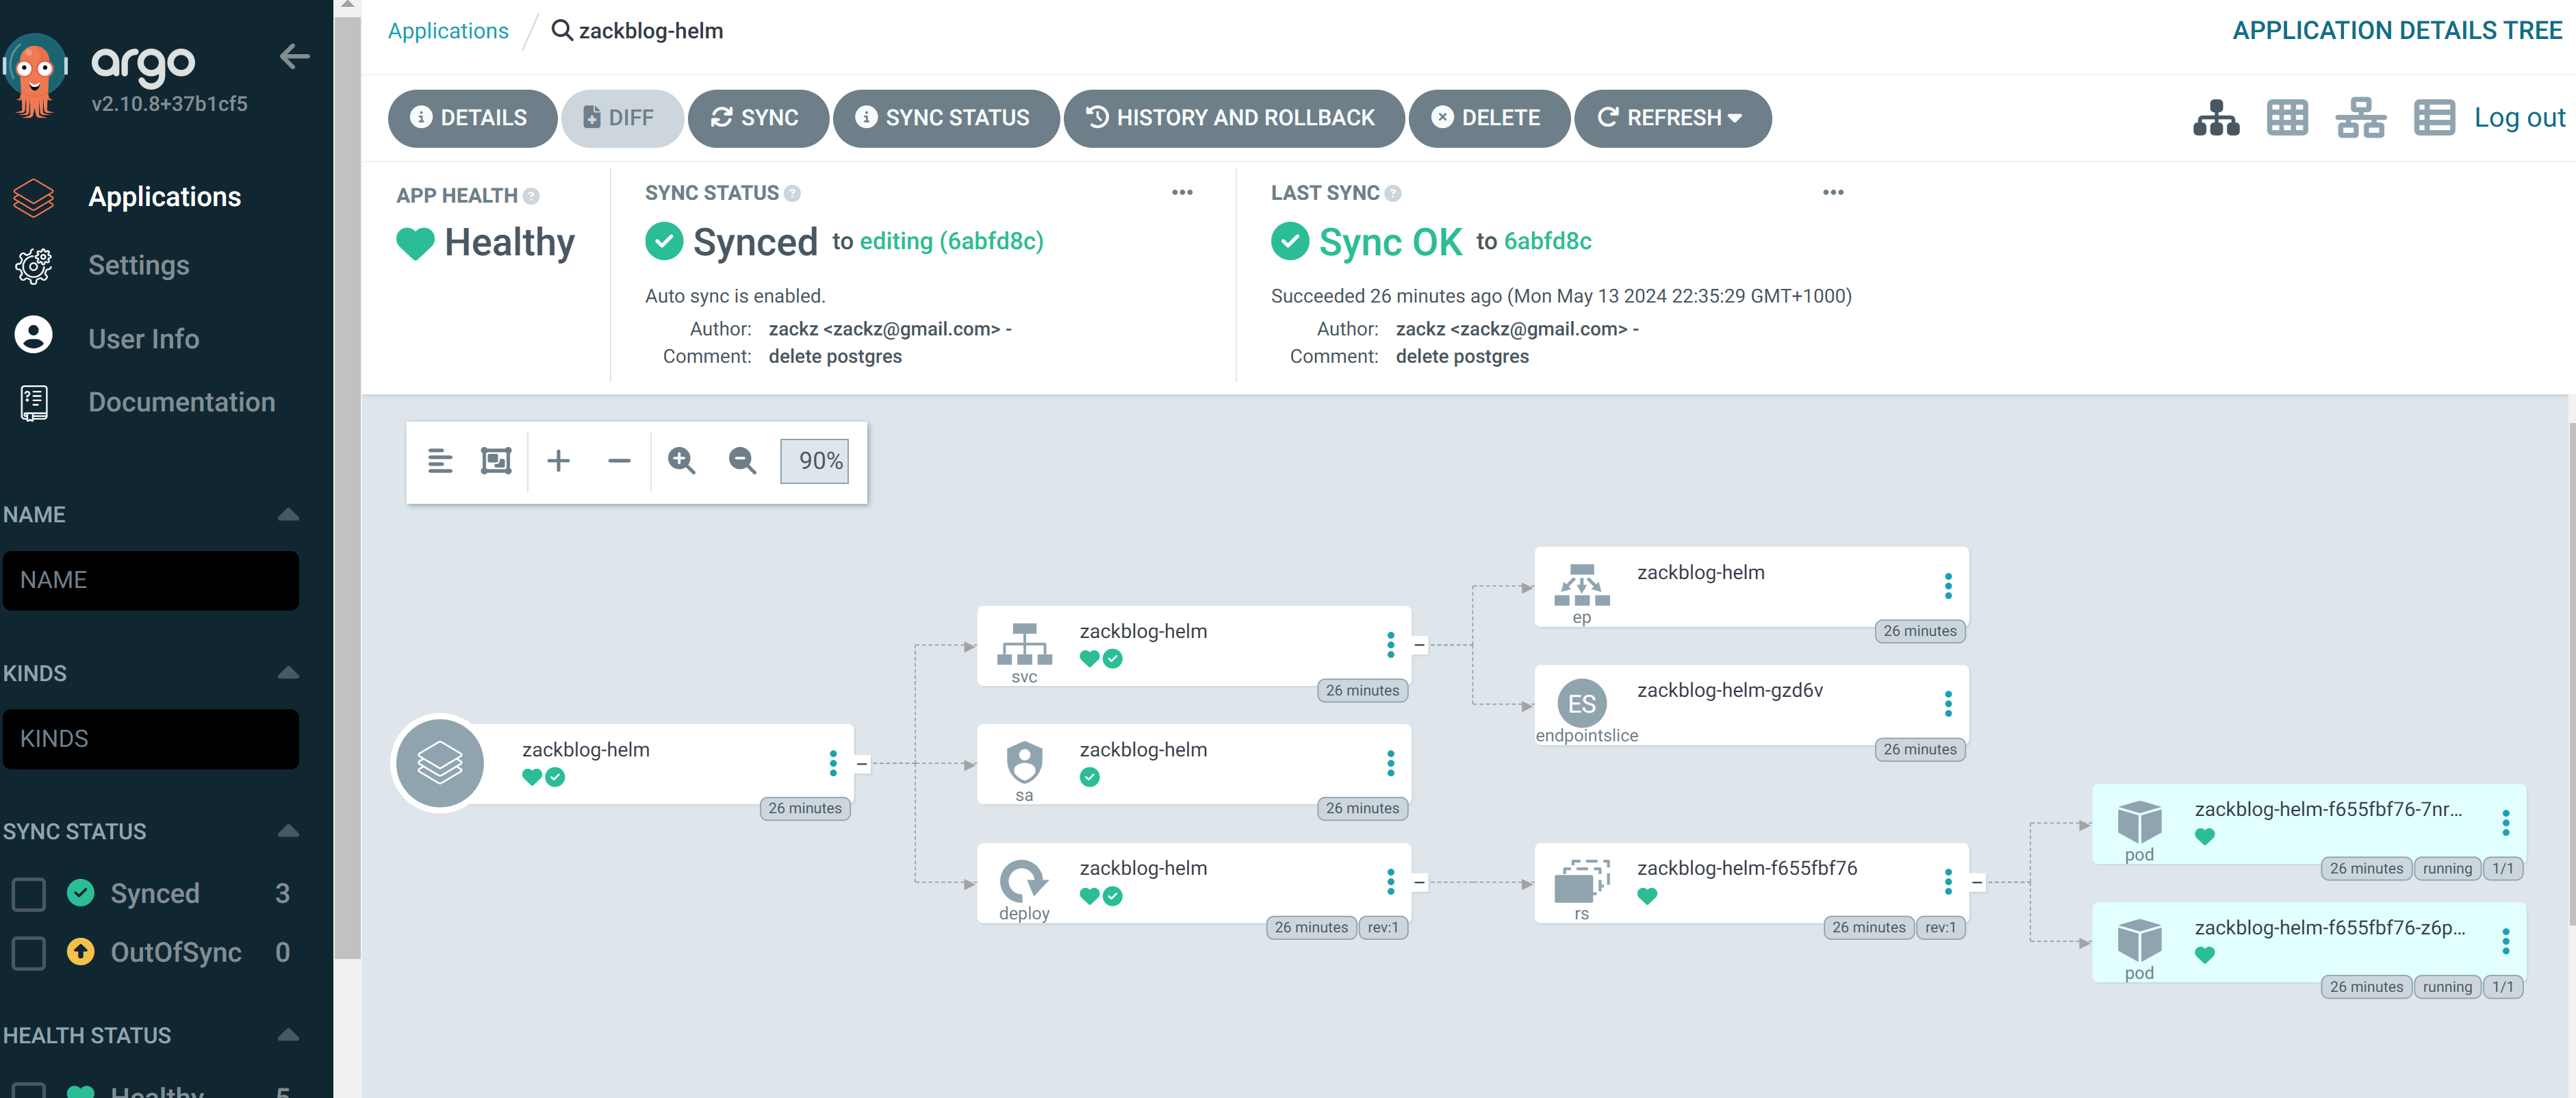
- Integrate chart deployment with ArgoCD
# argoCD application manifest
project: default
source:
  repoURL: 'https://github.com/ZackZhouHB/zack-gitops-project.git'
  path: argo-helm-zackblog
  targetRevision: editing
  helm:
    valueFiles:
      - values.yaml
destination:
  server: 'https://kubernetes.default.svc'
  namespace: helm
syncPolicy:
  automated: {}
  syncOptions:
    - CreateNamespace=true
 Conclusion
Finally, I had a chance to go over helm, it makes package management easier and more convenient, through charts, k8s deployment can be more flexible with values and templates that can be deployed and reusable into different environments, it provides versioning and rollbacks, also allow customization of the template. However using online charts can also be risky in a production environment with quality, dependency, and security risks.
Next stage for Helm advanced templating:
- Helmfile for Multi-Release Management
- Use Helm’s built-in test hooks to create automated tests for your deployments
- Master dependencies and subcharts for modular Helm chart creation
- Helm Chart private Repositories and Version Control
- Helm + Kustomize Hybrid Approaches