
AWS Private Link and Cross-account Package deployment
Recently I got a task from the Company’s app team, to install an agent on EC2 instances across several AWS accounts and enable connection via AWS private link to a target AWS account where the management server is hosted. To achieve this task, here I will see how to use AWS Systems Manager for software distribution and installation for multiple AWS accounts and install and configure AWS private link using Terraform.
Automate agent installation via SSM Run Command
Here I need a shell script to:
- Identify Running Instances: Detect all running Linux and Windows EC2 instances in the specified AWS account.
- Tag Instances Based on SSM Availability: Check if the SSM agent is available for each instance and assign tags to reflect the SSM status (ssm-linux, no-ssm-linux, ssm-windows, no-ssm-windows).
- Create SSM Command Documents:
- For Linux: Install Agent by running a shell script.
- For Windows: Run a testing command to retrieve the Windows OS version.
- Execute Commands via SSM: Run the corresponding commands on Linux and Windows instances that have SSM agents available to install the agent to cover both Windows and Linux.
#!/bin/bash

# Define the tag key and new values
TAG_KEY="dtagent"
REGION="ap-southeast-2"

# Step 1: Get a list of all running Linux and Windows instance IDs

# Get Linux instance IDs
LINUX_INSTANCE_IDS=$(aws ec2 describe-instances \
  --filters "Name=platform-details,Values=Linux/UNIX" "Name=instance-state-name,Values=running" \
  --query "Reservations[*].Instances[*].InstanceId" \
  --output text)

# Get Windows instance IDs
WINDOWS_INSTANCE_IDS=$(aws ec2 describe-instances \
  --filters "Name=platform-details,Values=Windows" "Name=instance-state-name,Values=running" \
  --query "Reservations[*].Instances[*].InstanceId" \
  --output text)

# Step 2: Check for SSM agent availability and tag instances accordingly

# Function to check SSM availability and assign tags
tag_instance_based_on_ssm() {
  local INSTANCE_ID=$1
  local PLATFORM=$2

  # Check if the instance is managed by SSM
  SSM_STATUS=$(aws ssm describe-instance-information \
    --filters "Key=InstanceIds,Values=$INSTANCE_ID" \
    --query "InstanceInformationList[*].PingStatus" \
    --output text)

  # Determine tag value based on SSM status and platform
  if [ "$PLATFORM" == "Linux" ]; then
    if [ "$SSM_STATUS" == "Online" ]; then
      TAG_VALUE="ssm-linux"
    else
      TAG_VALUE="no-ssm-linux"
    fi
  elif [ "$PLATFORM" == "Windows" ]; then
    if [ "$SSM_STATUS" == "Online" ]; then
      TAG_VALUE="ssm-windows"
    else
      TAG_VALUE="no-ssm-windows"
    fi
  fi

  # Apply the determined tag to the instance
  aws ec2 create-tags --resources "$INSTANCE_ID" --tags Key=$TAG_KEY,Value=$TAG_VALUE
}

# Tag Linux instances based on SSM availability
for INSTANCE_ID in $LINUX_INSTANCE_IDS; do
  tag_instance_based_on_ssm "$INSTANCE_ID" "Linux"
done

# Tag Windows instances based on SSM availability
for INSTANCE_ID in $WINDOWS_INSTANCE_IDS; do
  tag_instance_based_on_ssm "$INSTANCE_ID" "Windows"
done

echo "Tagging complete. Instances have been tagged with SSM availability status."

sleep 10

# Step 3: Create JSON files for SSM command documents (Linux and Windows)
cat  EOF  linux_dtcommand.json
{
  "schemaVersion": "2.2",
  "description": "Dynatrace oneagent installation command for Linux via SSM",
  "mainSteps": [
    {
      "action": "aws:runShellScript",
      "name": "LinuxDTCommand",
      "inputs": {
        "runCommand": [
          "curl -o /tmp/dtssm.sh https://raw.githubusercontent.com/ZackZhouHB/zack-gitops-project/refs/heads/editing/Python_scripts/testssm.sh",
          "chmod +x /tmp/dtssm.sh",
          "/tmp/dtssm.sh"
        ]
      }
    }
  ]
}
EOF

cat EOF  windows_dtcommand.json
{
  "schemaVersion": "2.2",
  "description": "Fetch Windows OS version via SSM",
  "mainSteps": [
    {
      "action": "aws:runPowerShellScript",
      "name": "WindowsOSVersionCheck",
      "inputs": {
        "runCommand": [
          "(Get-ItemProperty -Path 'HKLM:\\\\SOFTWARE\\\\Microsoft\\\\Windows NT\\\\CurrentVersion').ProductName"        ]
      }
    }
  ]
}
EOF


# Step 4: Create the SSM documents
aws ssm create-document \
  --name "LinuxDTCommand" \
  --document-type "Command" \
  --content file://linux_dtcommand.json

aws ssm create-document \
  --name "WindowsDTCommand" \
  --document-type "Command" \
  --content file://windows_dtcommand.json

# Step 5: Send the SSM command to Linux instances with "ssm-linux" tag
aws ssm send-command \
  --document-name "LinuxDTCommand" \
  --targets "Key=tag:$TAG_KEY,Values=ssm-linux" \
  --comment "Execute Dynatrace oneagent installation on all Linux instances with SSM" \
  --max-concurrency "50" \
  --max-errors "0" \
  --region $REGION

# Step 6: Send the SSM command to Windows instances with "ssm-windows" tag
aws ssm send-command \
  --document-name "WindowsDTCommand" \
  --targets "Key=tag:$TAG_KEY,Values=ssm-windows" \
  --comment "Execute Dynatrace oneagent installation on all Windows instances with SSM" \
  --max-concurrency "50" \
  --max-errors "0" \
  --region $REGION

echo "Commands sent to instances with SSM agent available."
The result can be verified via EC2 console for the tags, together in AWS SSM console for the commands execution status.
Cross account AWS private link setup
Here I will use both of my own AWS accounts `zack` and `joe`, to set up and verify a PrivateLink connection:
- Provider Account (Zack): Hosting a service (Python HTTP server on port 9080) running on an EC2 instance behind a Network Load Balancer (NLB).
- Consumer Account (Joe): Accessing the service securely through a VPC Endpoint without exposing the service to the internet.
Run a simple Python HTTP server on port 9080 in the provider account (Zack)
In Provider Account (Zack):
- SSH into Zackblog EC2 running a docker Python HTTP service on port 9080.
root@ip-172-31-26-78:/var/snap/amazon-ssm-agent/9881# docker pull python:3

root@ip-172-31-26-78:/var/snap/amazon-ssm-agent/9881# docker run -d -p 9080:9080 --name test-container python:3 python

root@ip-172-31-26-78:/var/snap/amazon-ssm-agent/9881# docker ps
CONTAINER ID   IMAGE      COMMAND                  CREATED             STATUS             PORTS                                       NAMES
6e0dabbd7d5b   python:3   "python -m http.serv…"   About an hour ago   Up About an hour   0.0.0.0:9080->9080/tcp, :::9080->9080/tcp   test-container

root@ip-172-31-26-78:/var/snap/amazon-ssm-agent/9881# curl localhost:9080
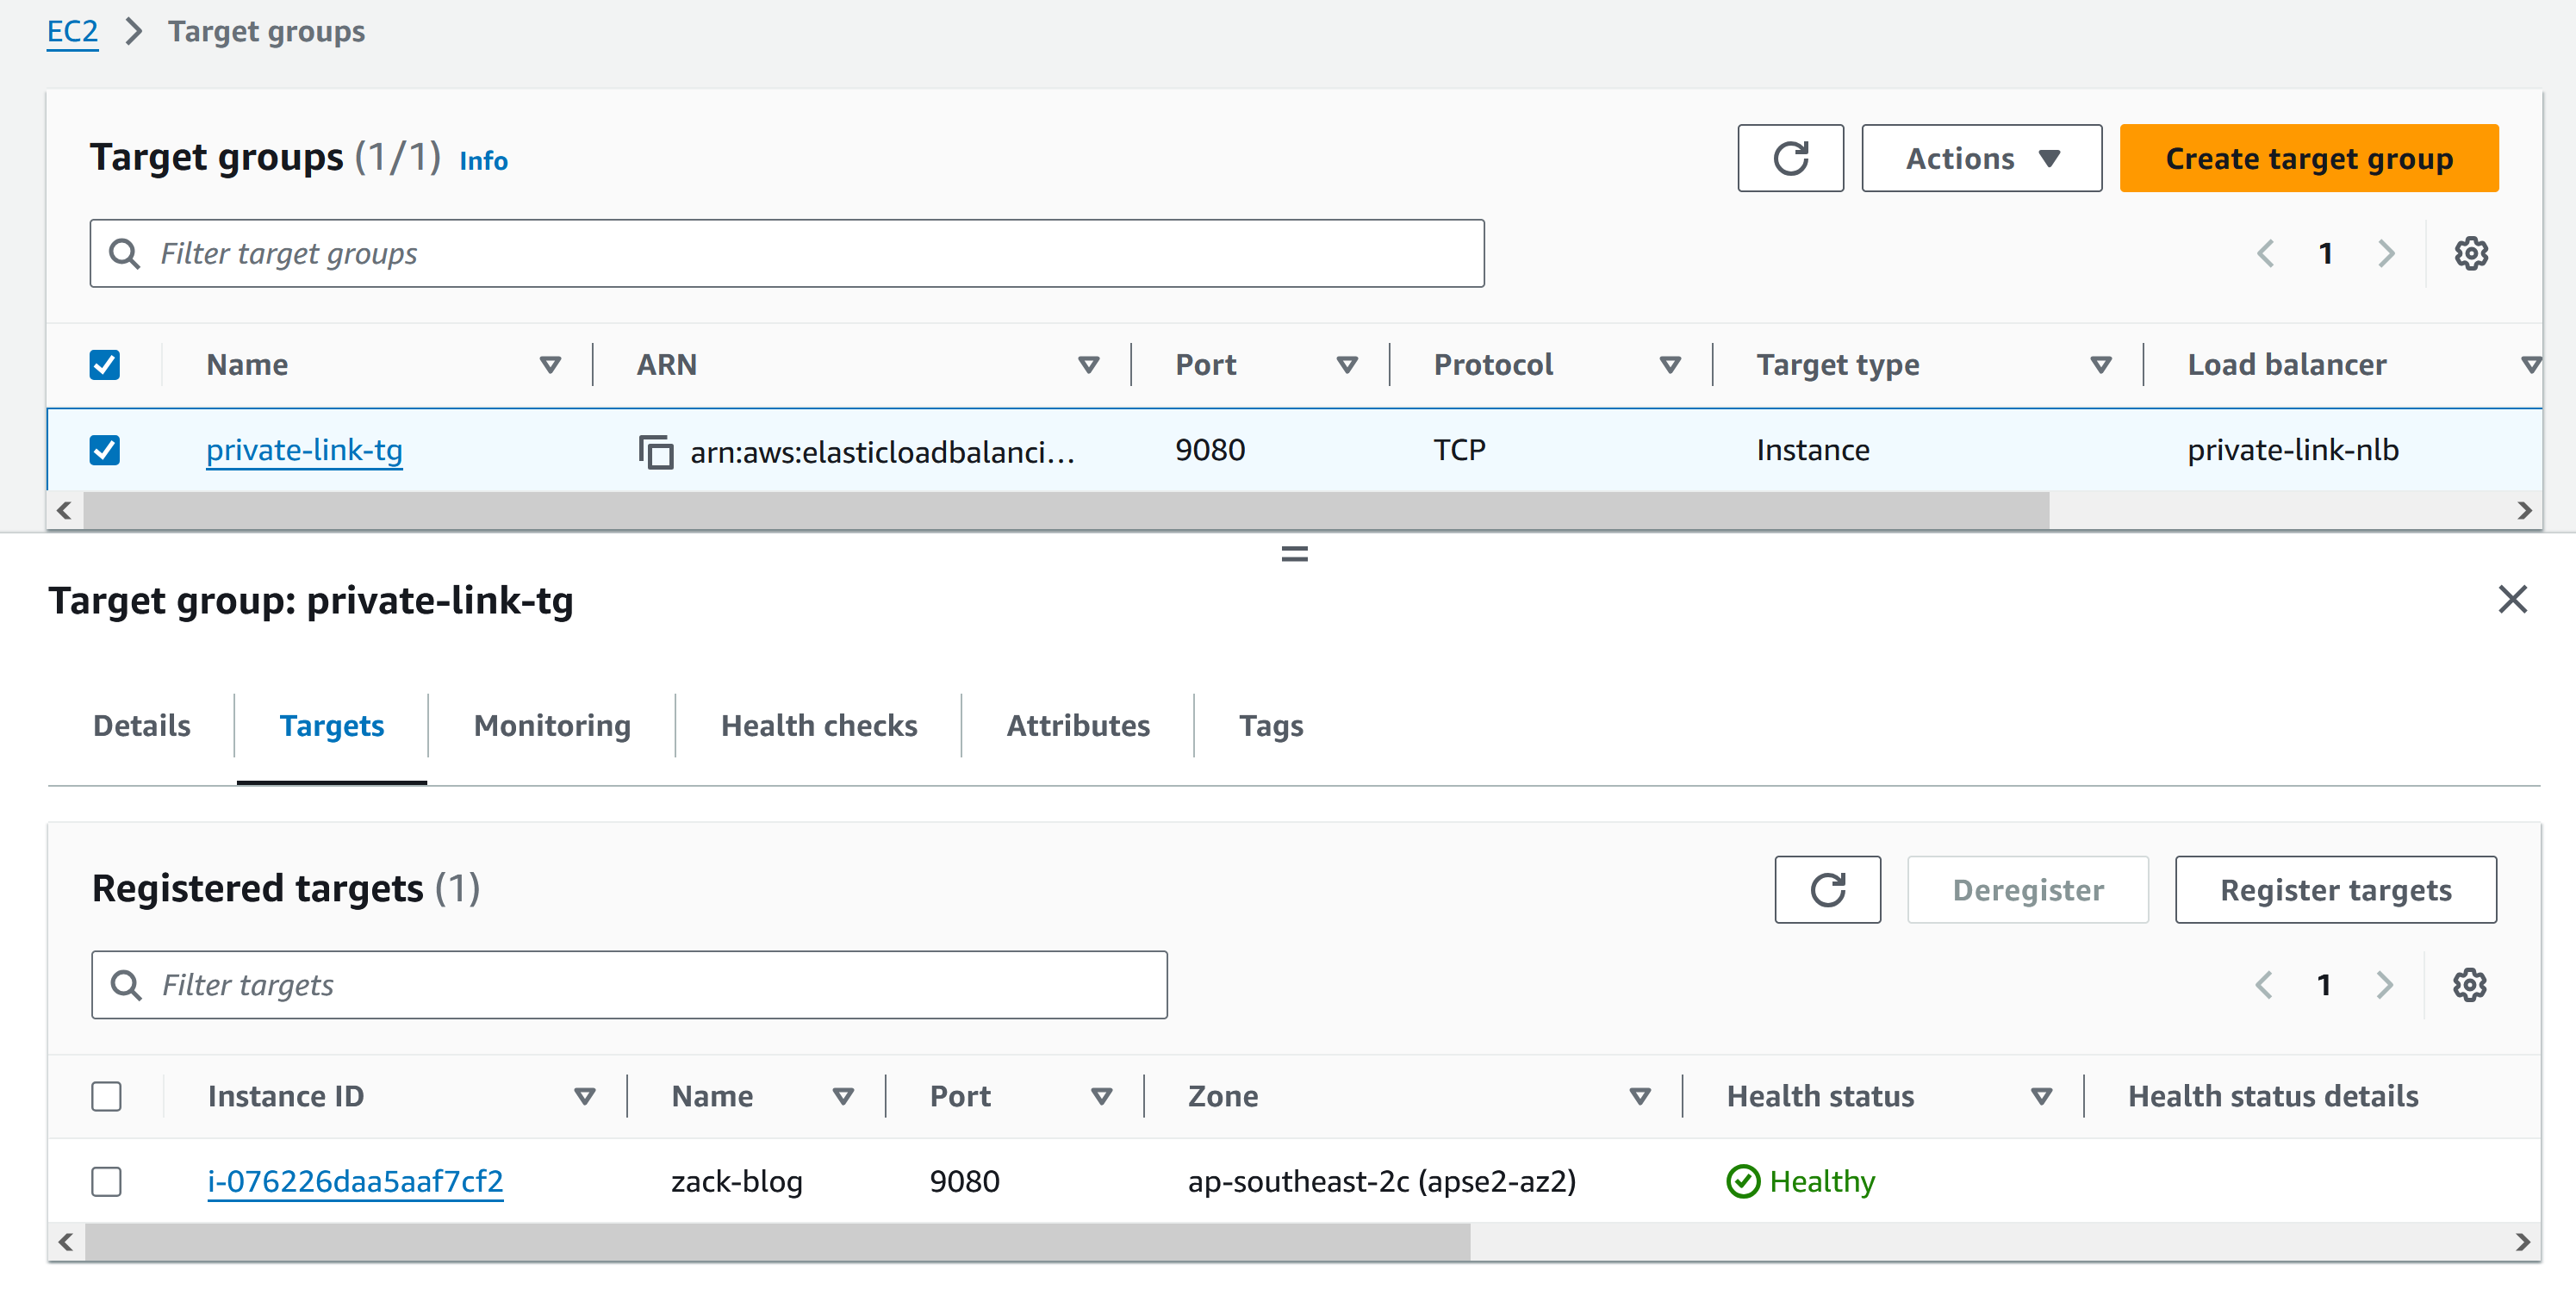
- Create an NLB with Security group forwards traffic to TCP 9080 port on the EC2 instance.
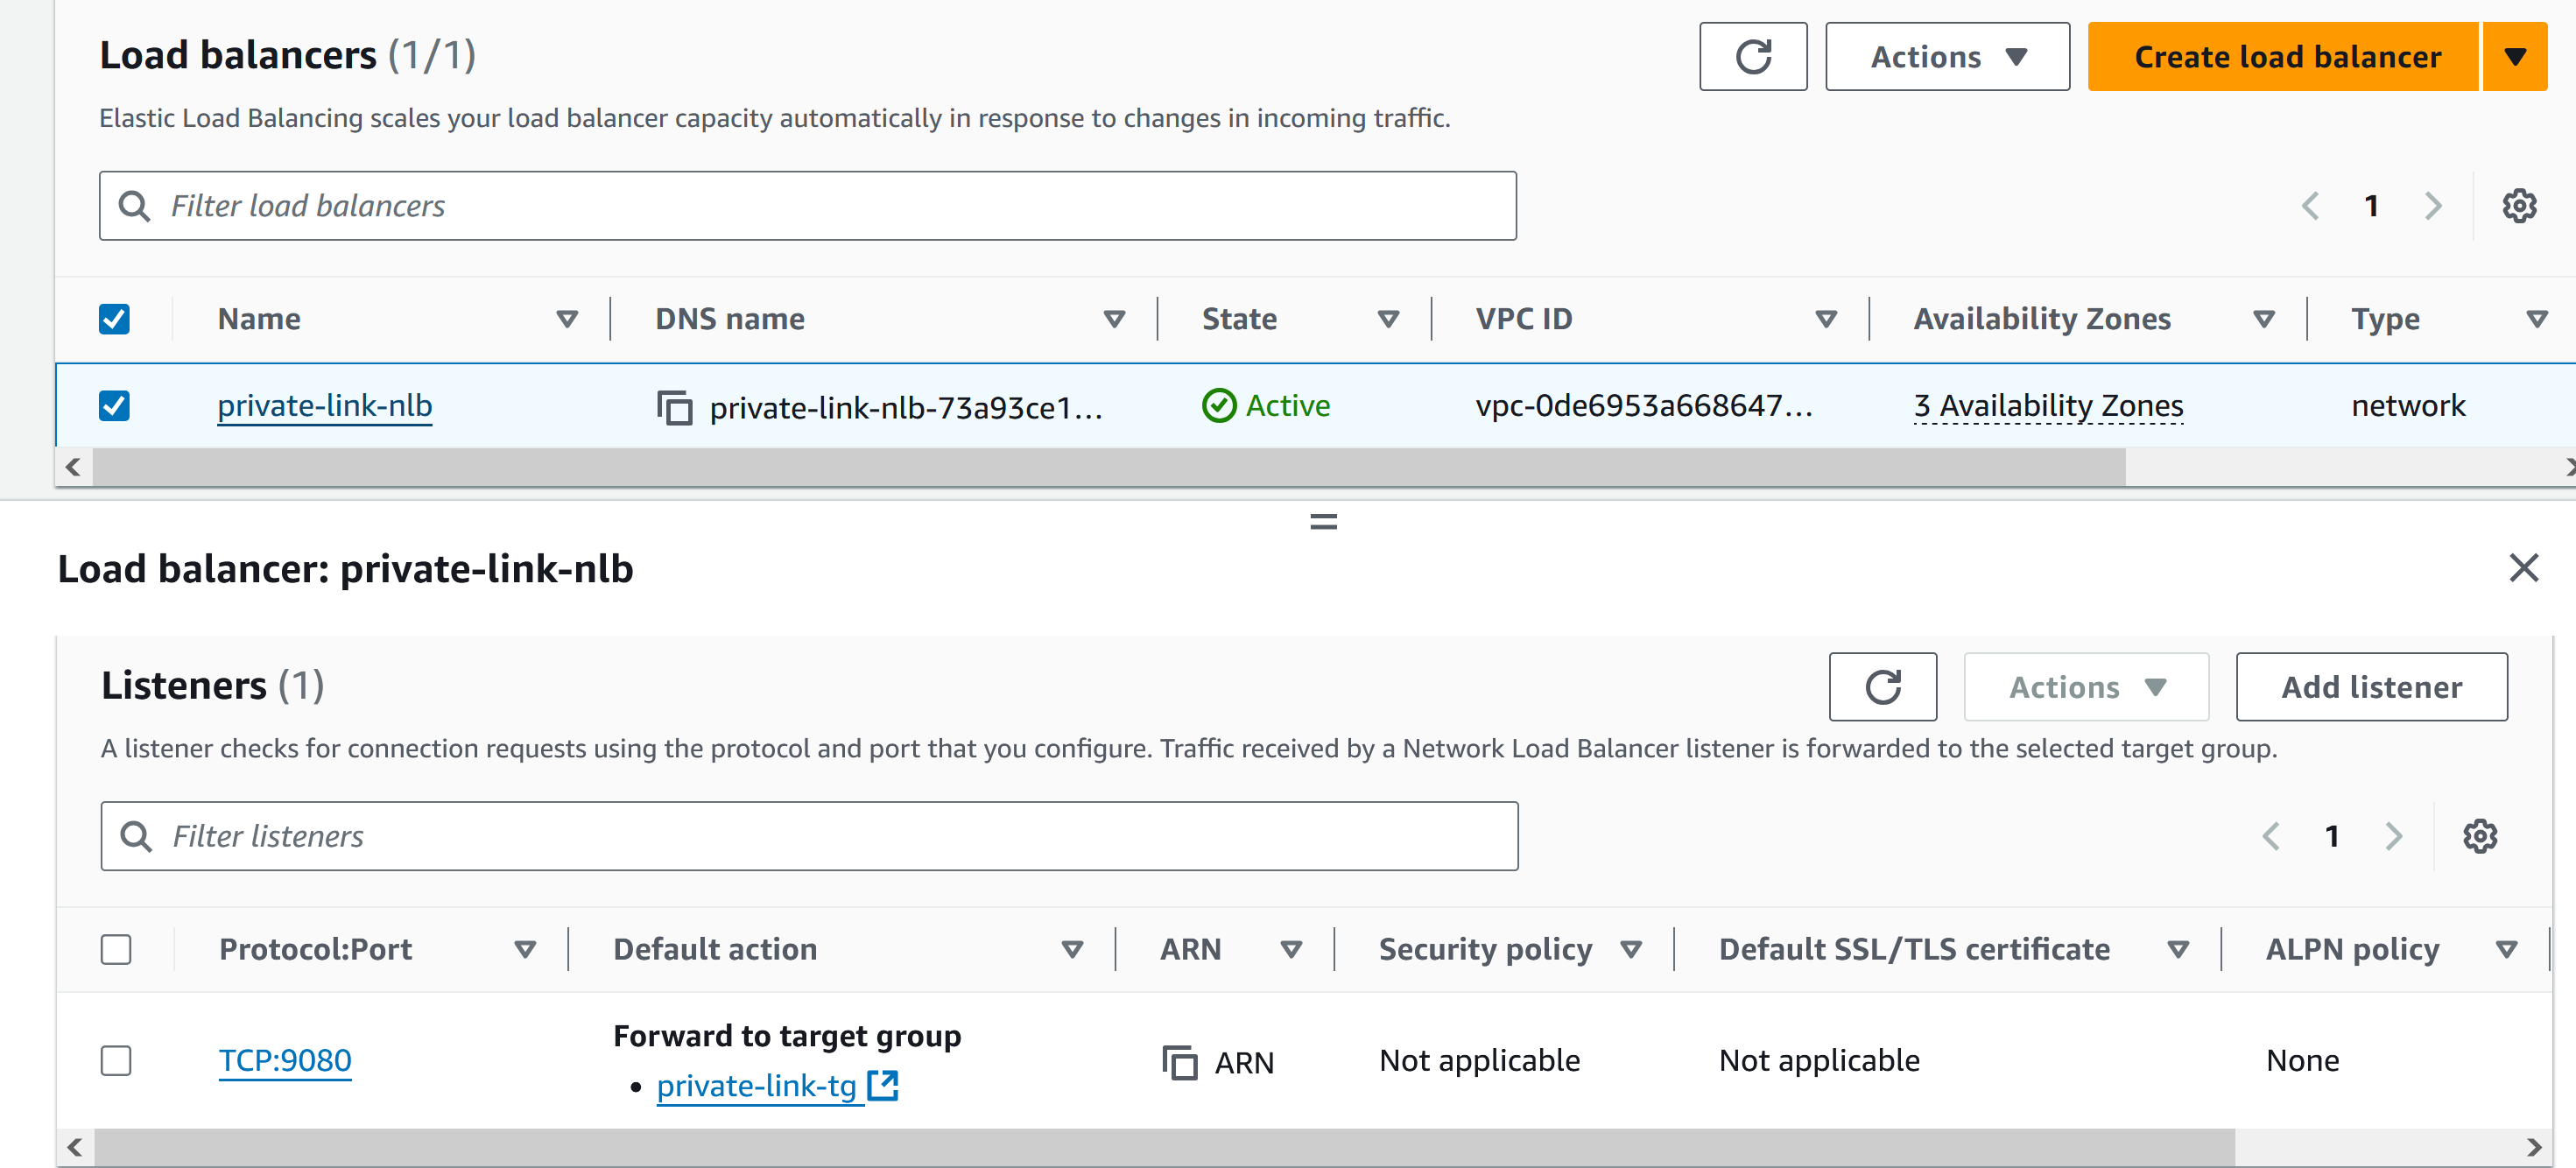
- Register the instance as a target group, create VPC Endpoint Service to expose the NLB to consumer accounts.
- Manual approve when receiving a connection request from the consumer account.
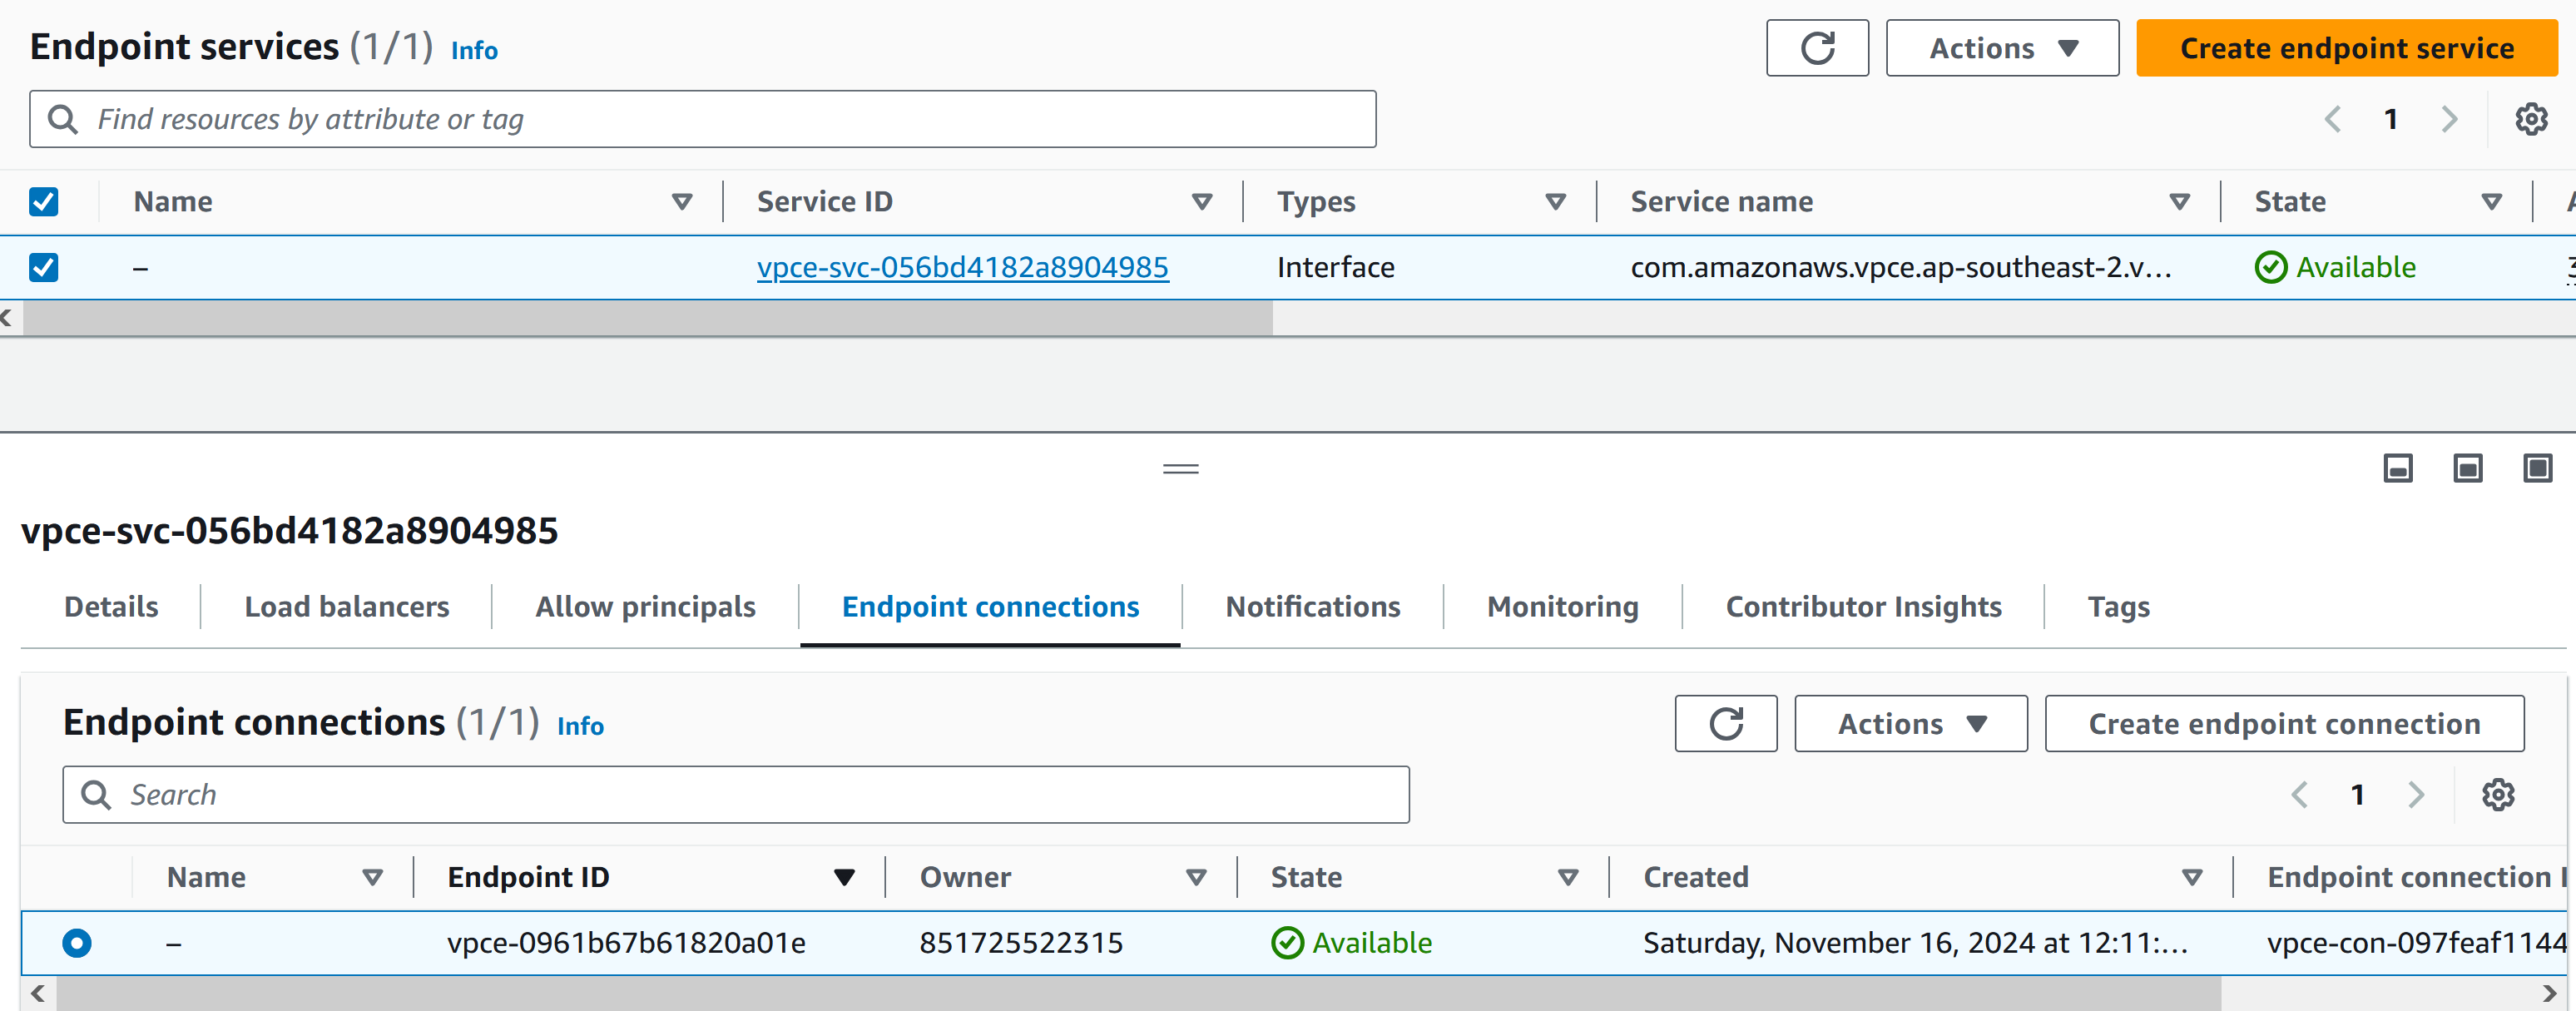
In Consumer Account (Joe):
- Create a VPC Interface Endpoint request and connect to the provider's endpoint service.
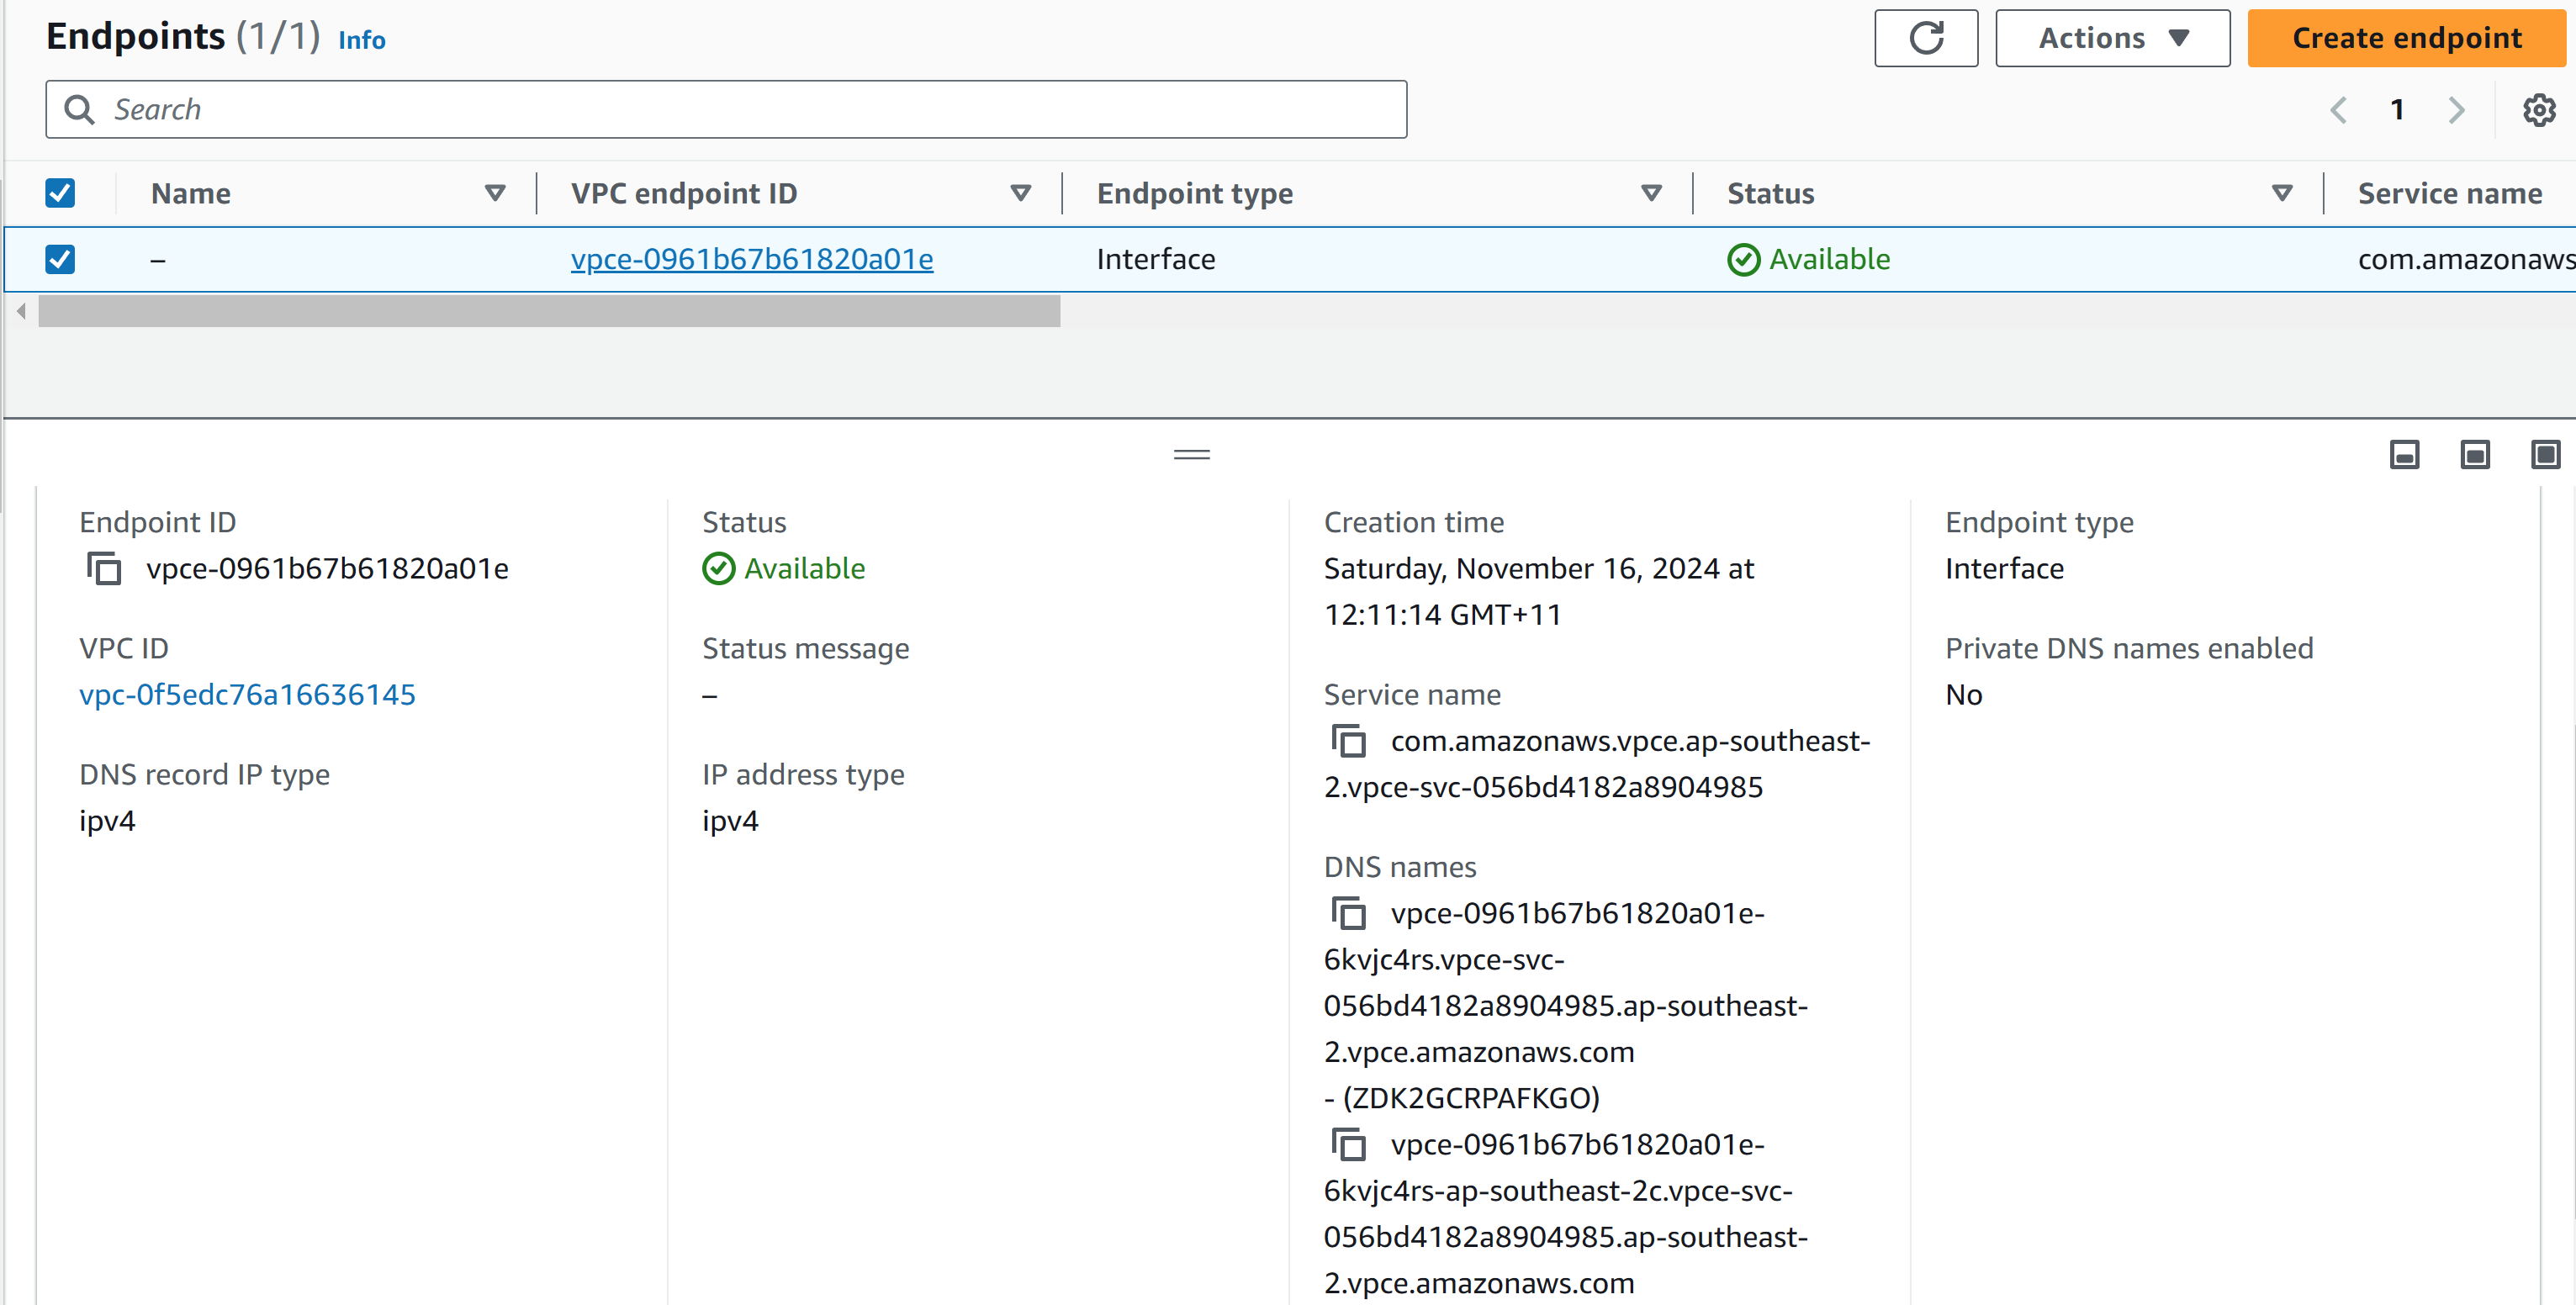
- Create a testing EC2 with port 9080 allowed from the security group, run curl to the private DNS name with port 9080 to verify the private link.
ubuntu@ip-172-31-54-206:~$ curl http://vpce-0961b67b61820a01e-6kvjc4rs.vpce-svc-056bd4182a8904985.ap-southeast-2.vpce.amazonaws.com:9080
Here it can be seen that the traffic from the consumer EC2 Ubuntu instance is routed through the endpoint to the NLB and then to the service in the provider account.
Using Terraform to create the above resources, so it can be easily destroyed for lab purposes and reused across more AWS accounts.
First in the provider account, create NLB, Security group for NLB to allow 9080, Target group to register Zackblog EC2, Listener, VPC endpoint service.
# main.tf for provider account

# Provider Account Configuration
provider "aws" {
  profile = "zack" # AWS account profile for provider
  region  = "ap-southeast-2"
}

# Fetch Existing VPC and Subnet
data "aws_vpc" "default" {
  default = true
}

data "aws_subnet" "subnet1" {
  id = "subnet-0ssssssssss69a"
}

data "aws_subnet" "subnet2" {
  id = "subnet-073ssssssssss46db"
}

data "aws_subnet" "subnet3" {
  id = "subnet-09sssssss129" #
}

# Fetch Existing Security Group for EC2 Instance
data "aws_security_group" "ec2_sg" {
  id = "sg-01ssssssss7c" # Security Group ID of Zackblog EC2 instance
}


# Create Security Group for NLB
resource "aws_security_group" "nlb_sg" {
  name        = "nlb-private-link-sg"
  vpc_id      = data.aws_vpc.default.id
  description = "Allow traffic to NLB from consumer accounts"

  egress {
    from_port   = 0
    to_port     = 0
    protocol    = "-1"
    cidr_blocks = ["0.0.0.0/0"]
  }

  ingress {
    from_port   = 9080
    to_port     = 9080
    protocol    = "tcp"
    cidr_blocks = ["172.31.48.0/20"] # Updated to match consumer's new CIDR
  }
}

# Allow NLB to Access EC2 on Port 9080
resource "aws_security_group_rule" "ec2_inbound_from_nlb" {
  type                     = "ingress"
  security_group_id        = data.aws_security_group.ec2_sg.id # Existing EC2 SG
  from_port                = 9080
  to_port                  = 9080
  protocol                 = "tcp"
  source_security_group_id = aws_security_group.nlb_sg.id # Allow traffic from NLB SG
}


# Create NLB
resource "aws_lb" "nlb" {
  name               = "private-link-nlb"
  internal           = true
  load_balancer_type = "network"
  subnets            = [
    data.aws_subnet.subnet1.id,
    data.aws_subnet.subnet2.id,
    data.aws_subnet.subnet3.id
  ]
  security_groups    = [aws_security_group.nlb_sg.id]
}

# Create NLB Target Group
resource "aws_lb_target_group" "tg" {
  name        = "private-link-tg"
  port        = 9080
  protocol    = "TCP"
  vpc_id      = data.aws_vpc.default.id
  target_type = "instance"
}

# Attach EC2 Instance to Target Group
resource "aws_lb_target_group_attachment" "tg_attachment" {
  target_group_arn = aws_lb_target_group.tg.arn
  target_id        = "i-076sssssssscf2" # Zackblog instance ID
  port             = 9080
}

# Add Listener for NLB
resource "aws_lb_listener" "nlb_listener" {
  load_balancer_arn = aws_lb.nlb.arn  # Reference the NLB created in your Terraform configuration
  port              = 9080           # Listener port
  protocol          = "TCP"          # Protocol for the listener

  default_action {
    type             = "forward"
    target_group_arn = aws_lb_target_group.tg.arn  # Reference the target group created in your Terraform configuration
  }
}

# Create Endpoint Service
resource "aws_vpc_endpoint_service" "private_link_service" {
  acceptance_required = true
  network_load_balancer_arns = [
    aws_lb.nlb.arn,
  ]
  allowed_principals = [
    "arn:aws:iam::8ssssssssss5:root" # Replace with account joe's ID
  ]
  private_dns_name = "zzservice.internal" # Provide a custom private DNS name
}

output "endpoint_service_name" {
  value       = aws_vpc_endpoint_service.private_link_service.service_name
  description = "The name of the VPC Endpoint Service to share with the consumer account"
}
Then in the consumer account, create an interface endpoint, security group for the Interface Endpoint, and a testing Ubuntu EC2 in a new non-overlapping subnet.
# main.tf for joe account as consumer

# Consumer Account Configuration
provider "aws" {
  profile = "joe" # AWS account profile for consumer
  region  = "ap-southeast-2"
}

# Fetch Existing VPC and Subnet
data "aws_vpc" "default" {
  default = true
}

# Create a new non-overlapping subnet in account Joe
resource "aws_subnet" "new_consumer_subnet" {
  vpc_id                  = data.aws_vpc.default.id
  cidr_block              = "172.31.48.0/20"     # Updated CIDR to avoid overlap
  availability_zone       = "ap-southeast-2c" # Same AZ as the testing EC2 instance
  map_public_ip_on_launch = false             # Optional: Prevent public IP assignment
  tags = {
    Name = "Consumer-New-PrivateLink-Subnet"
  }
}

# Create Security Group for Interface Endpoint
resource "aws_security_group" "endpoint_sg" {
  name        = "private-link-endpoint-sg"
  vpc_id      = data.aws_vpc.default.id
  description = "Allow traffic to the interface endpoint"

  ingress {
    from_port   = 9080
    to_port     = 9080
    protocol    = "tcp"
    cidr_blocks = ["172.31.48.0/20"] # Updated to match new consumer CIDR
  }

  egress {
    from_port   = 0
    to_port     = 0
    protocol    = "-1"
    cidr_blocks = ["0.0.0.0/0"]
  }
}

resource "aws_vpc_endpoint" "interface_endpoint" {
  vpc_id             = data.aws_vpc.default.id
  service_name       = "com.amazonaws.vpce.ap-southeast-2.vpce-svc-0ssssssssss5"
  subnet_ids         = [aws_subnet.new_consumer_subnet.id]
  security_group_ids = [aws_security_group.endpoint_sg.id]
  private_dns_enabled = false # Temporarily disable for accept connection from provider account then change to true
  vpc_endpoint_type  = "Interface"
}

# Replace the null resource with a manual acceptance process (preferred)
output "accept_endpoint_instructions" {
  value = < \
    --vpc-endpoint-ids
  EOT
}

# Dynamically Fetch the Subnet
data "aws_subnet" "new_consumer_subnet" {
  filter {
    name   = "cidr-block"
    values = ["172.31.48.0/20"] # Replace with the CIDR block of the desired subnet
  }

  filter {
    name   = "vpc-id"
    values = [data.aws_vpc.default.id]
  }
}

# Create Security Group for Testing
resource "aws_security_group" "testing_sg" {
  name        = "testing-private-link-sg"
  vpc_id      = data.aws_vpc.default.id
  description = "Security group for testing EC2 instance"

  ingress {
    from_port   = 22
    to_port     = 22
    protocol    = "tcp"
    cidr_blocks = ["0.0.0.0/0"] # Allow SSH from everywhere (change for production use)
  }

  ingress {
    from_port   = 9080
    to_port     = 9080
    protocol    = "tcp"
    cidr_blocks = ["172.31.0.0/16"] # Allow traffic to PrivateLink endpoint within VPC
  }

  egress {
    from_port   = 0
    to_port     = 0
    protocol    = "-1"
    cidr_blocks = ["0.0.0.0/0"]
  }
}

# Launch EC2 Instance in 172.31.48.0/20 Subnet
resource "aws_instance" "testing_ec2" {
  ami                  = "ami-040e71e7b8391cae4" # Replace with a valid Amazon Linux 2 AMI for ap-southeast-2
  instance_type        = "t2.micro"
  subnet_id            = data.aws_subnet.new_consumer_subnet.id
  vpc_security_group_ids = [aws_security_group.testing_sg.id] # Use the correct attribute for SGs with subnets

  associate_public_ip_address = true # Assign a public IP address

  key_name = "xxxxx1"

  tags = {
    Name = "PrivateLink-Testing-EC2"
  }
}
Finally, SSH into the new EC2 instance and run the following command to test the PrivateLink endpoint.
Conclusion
- Traffic Flow
- Consumer EC2 → PrivateLink Endpoint: Consumer EC2 uses the private DNS name to send requests to the endpoint. The VPC interface endpoint forwards traffic securely to the NLB in the provider account.
- NLB → EC2 Instance: The NLB routes traffic from the VPC endpoint to the EC2 instance based on the target group configuration.
- EC2 Instance → Service: The EC2 instance processes the request and responds back via the same path.
- What We Accomplished
- Used Terraform to automate resource creation for NLB, target group, VPC endpoint service, and consumer endpoint.
- Successfully accessed the Python HTTP server from the consumer EC2 instance using the private DNS name via PrivateLink.
- Verified connectivity from consumer EC2 to provider service.