MLOps - Setup a Home Machine Learning Lab
Transitioning from DevOps to MLOps can be achieved by leveraging existing DevOps expertise by adding new layers specific to machine learning.
- Key Differences:
Model Lifecycle Management: MLOps handles model training, deployment, and retraining.Data Versioning: Tools like DVC ensure dataset version control.Experiment Tracking: MLflow and Weights & Biases track model training parameters and results.Model Serving: Deploy models with TensorFlow Serving or TorchServe.Model Drift: Monitor data changes over time to trigger retraining.
- Core MLOps Tools:
Model Training & Experimentation: Tools like DVC, MLflow, and Kubeflow for managing data, tracking experiments, and distributed training.Model Deployment & Serving: Use CI/CD pipelines, Docker, Kubernetes, and frameworks like ONNX for deploying models at scale.Monitoring & Retraining: Use Prometheus, Grafana, and Seldon for monitoring performance and retraining pipelines.Data Pipelines: Automate feature engineering with Apache Airflow, Dagster, or Kubeflow.
- Leverage DevOps Skills for MLOps:
CI/CD Pipelines: Automate model training, testing, and deployment with Jenkins or cloud solutions.Infrastructure as Code: Use Terraform or Ansible for cloud-based ML infrastructure.Containerization & Orchestration: Deploy ML models with Docker and Kubernetes.Monitoring: Track both infrastructure and model-specific metrics like accuracy and drift.
Local Lab ML practice
I will start the local lab by:
- Setting up a local ML environment
- Install ML-focused tools (Nvidia Cuda, Python3 and pip Virtual ENV, PyTorch, and Jupyter Notebook)
- Build and version simple ML models locally with tools like DVC, MLflow, and Docker.
Next stages I will try:
- Provision AWS Sagemaker using terraform or Cloudformation.
- Implement CI pipelines for Model training and continuous packaging.
- CD pipelines to provision AWS ECS or EKS to deploy models.
Prerequisites
- Windows 10 with Powershell and Windows Terminal installed
- CPU Virtualization enabled in BIOS
- WSL2 with Ubuntu LTS installed
- Docker Desktop
Install WSL with Ubuntu
First, we need to configure local WSL to install Ubuntu.
C:\Users\zack>wsl --list --online Use 'wsl.exe --install' to install NAME FRIENDLY NAME Ubuntu Ubuntu Debian Debian GNU/Linux kali-linux Kali Linux Rolling Ubuntu-18.04 Ubuntu 18.04 LTS Ubuntu-20.04 Ubuntu 20.04 LTS Ubuntu-22.04 Ubuntu 22.04 LTS Ubuntu-24.04 Ubuntu 24.04 LTS OracleLinux_7_9 Oracle Linux 7.9 OracleLinux_8_7 Oracle Linux 8.7 OracleLinux_9_1 Oracle Linux 9.1 openSUSE-Leap-15.6 openSUSE Leap 15.6 SUSE-Linux-Enterprise-15-SP5 SUSE Linux Enterprise 15 SP5 SUSE-Linux-Enterprise-15-SP6 SUSE Linux Enterprise 15 SP6 openSUSE-Tumbleweed openSUSE Tumbleweed C:\Users\zack>wsl --install -d Ubuntu-24.04 Installing: Ubuntu 24.04 LTS Installed Ubuntu 24.04 LTS。 Launching Ubuntu 24.04 LTS... Installing, this may take a few minutes... Installation successful! ubuntu@zackz:~$ cat /etc/os-release PRETTY_NAME="Ubuntu 24.04.1 LTS" NAME="Ubuntu" VERSION_ID="24.04" VERSION="24.04.1 LTS (Noble Numbat)" VERSION_CODENAME=noble ID=ubuntu ID_LIKE=debian HOME_URL="https://www.ubuntu.com/" SUPPORT_URL="https://help.ubuntu.com/" BUG_REPORT_URL="https://bugs.launchpad.net/ubuntu/" PRIVACY_POLICY_URL="https://www.ubuntu.com/legal/terms-and-policies/privacy-policy" UBUNTU_CODENAME=noble LOGO=ubuntu-logo
Install Nvidia CUDA
CUDA works with C. Thus, we need to install the gcc compiler first, then install CUDA from the official website of Nvidia, then configure the environment variable for post-installation [The official CUDA installation guide from Nvidia](https://docs.nvidia.com/cuda/cuda-installation-guide-linux/index.html).

sudo apt install gcc --fix-missing
wget https://developer.download.nvidia.com/compute/cuda/repos/wsl-ubuntu/x86_64/cuda-wsl-ubuntu.pin
sudo mv cuda-wsl-ubuntu.pin /etc/apt/preferences.d/cuda-repository-pin-600
wget https://developer.download.nvidia.com/compute/cuda/12.6.2/local_installers/cuda-repo-wsl-ubuntu-12-6-local_12.6.2-1_amd64.deb
sudo dpkg -i cuda-repo-wsl-ubuntu-12-6-local_12.6.2-1_amd64.deb
sudo cp /var/cuda-repo-wsl-ubuntu-12-6-local/cuda-*-keyring.gpg /usr/share/keyrings/
sudo apt-get update
sudo apt-get -y install cuda-toolkit-12-6
vim .bashrc
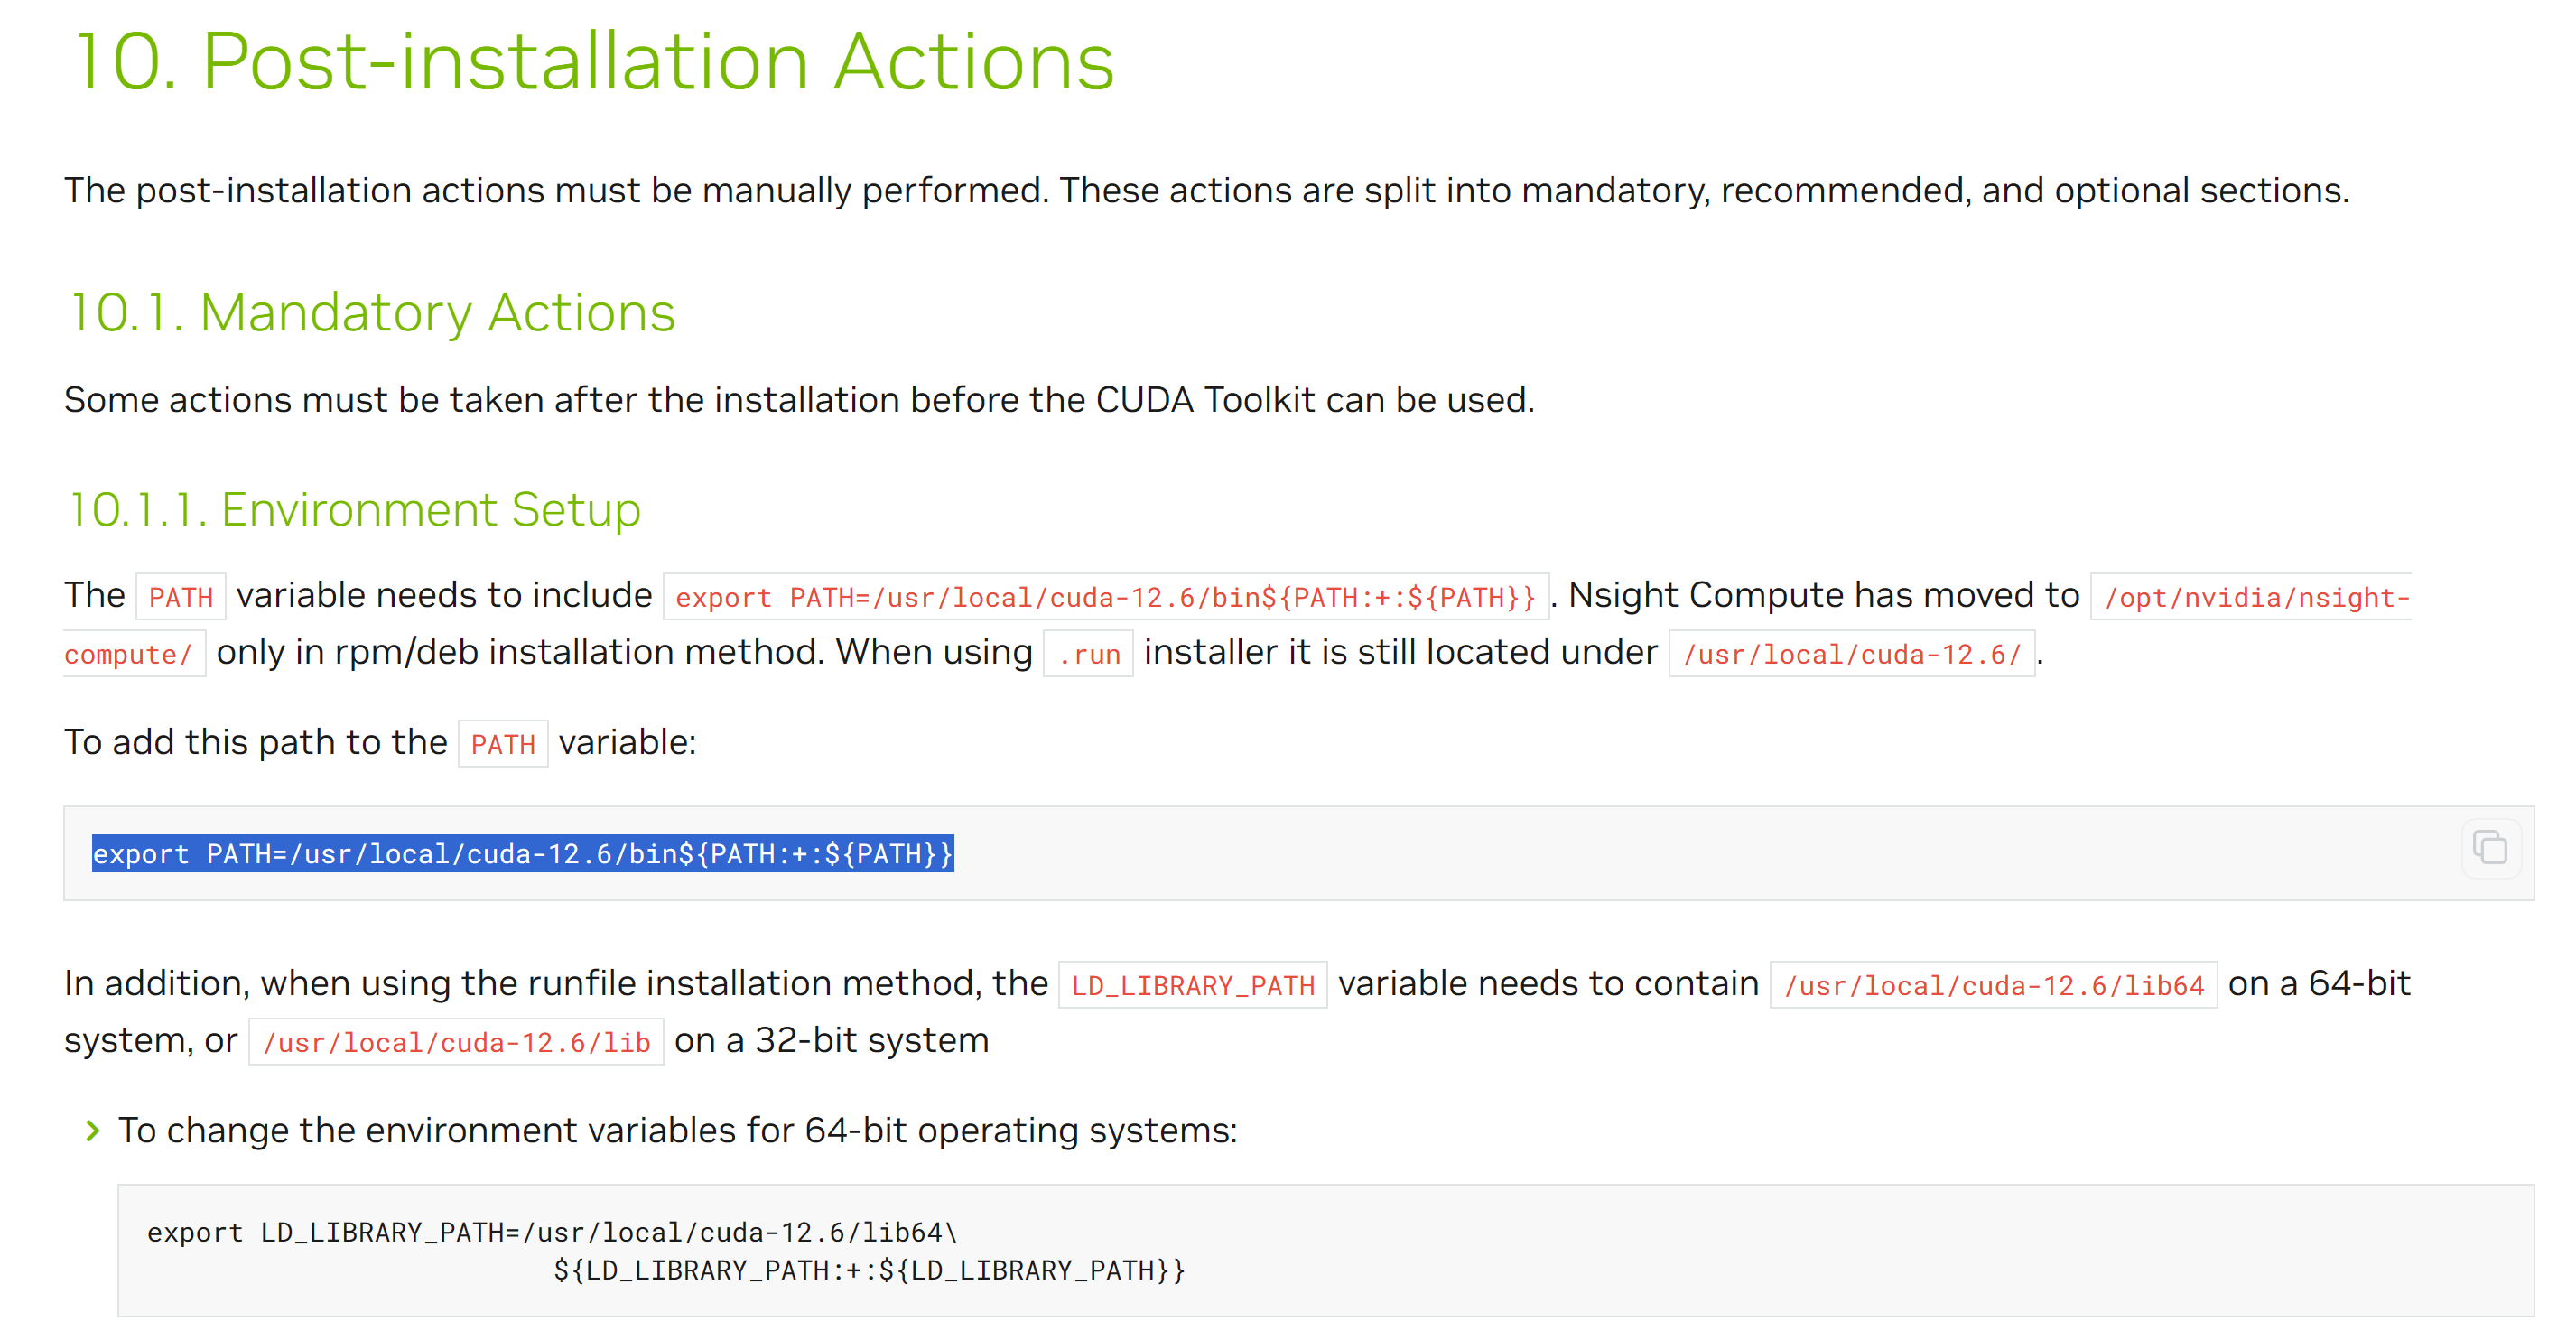
export PATH=/usr/local/cuda-12.6/bin${PATH:+:${PATH}}
# To apply and validate the changes,
source ~/.bashrc
echo $PATH
root@zackz:~# echo $PATH
Install the Nvidia Cuda Toolkit, check the Driver and CUDA versions, validate Nvidia Cuda Compiler Driver has been installed.
sudo apt install nvidia-cuda-toolkit

root@zackz:~# nvidia-smi
Wed Oct  9 10:53:26 2024
+---------------------------------------------------------------------------------------+
| NVIDIA-SMI 535.112                Driver Version: 537.42        CUDA Version: 12.2     |
|-----------------------------------------+----------------------+----------------------|
| GPU  Name                     Persistence-M | Bus-Id        Disp.A | Volatile Uncorr. ECC |
| Fan  Temp   Perf          Pwr:Usage/Cap |         Memory-Usage | GPU-Util  Compute M. |
|                                             |                     |                     |
|=========================================+======================+======================|
|   0  NVIDIA GeForce RTX 3070 Ti     On  | 00000000:01:00.0  On |                     N/A |
|  0%   55C   P0                80W / 148W |   1635MiB /  8192MiB |      1%      Default |
|                                             |                     |                     |
+-----------------------------------------+----------------------+----------------------+

+---------------------------------------------------------------------------------------+
| Processes:                                                                         |
|  GPU   GI   CI       PID   Type   Process name                 GPU Memory           |
| 0      N/A  N/A      27    G     /Xwayland                     N/A                 |
| 0      N/A  N/A      30    G     /Xwayland                     N/A                 |
| 0      N/A  N/A      37    G     /Xwayland                     N/A                 |
+---------------------------------------------------------------------------------------+

root@zackz:~# nvcc -V
nvcc: NVIDIA (R) Cuda compiler driver
Copyright (c) 2005-2024 NVIDIA Corporation
Built on Thu_Sep_12_02:18:05_PDT_2024
Cuda compilation tools, release 12.6, V12.6.77
Build cuda_12.6.r12.6/compiler.34841621_0
Install Python3 and PIP Virtual ENV
Ensure that python3 and PIP are installed, and create a virtual environment for PyTorch and Jupyter Notebook.
root@zackz:~# python3 --version
Python 3.12.3

sudo apt-get install python3-pip

apt install python3.12-venv

python3 -m venv jupyter_env

source jupyter_env/bin/activate

(jupyter_env)root@zackz:~#
Install PyTorch
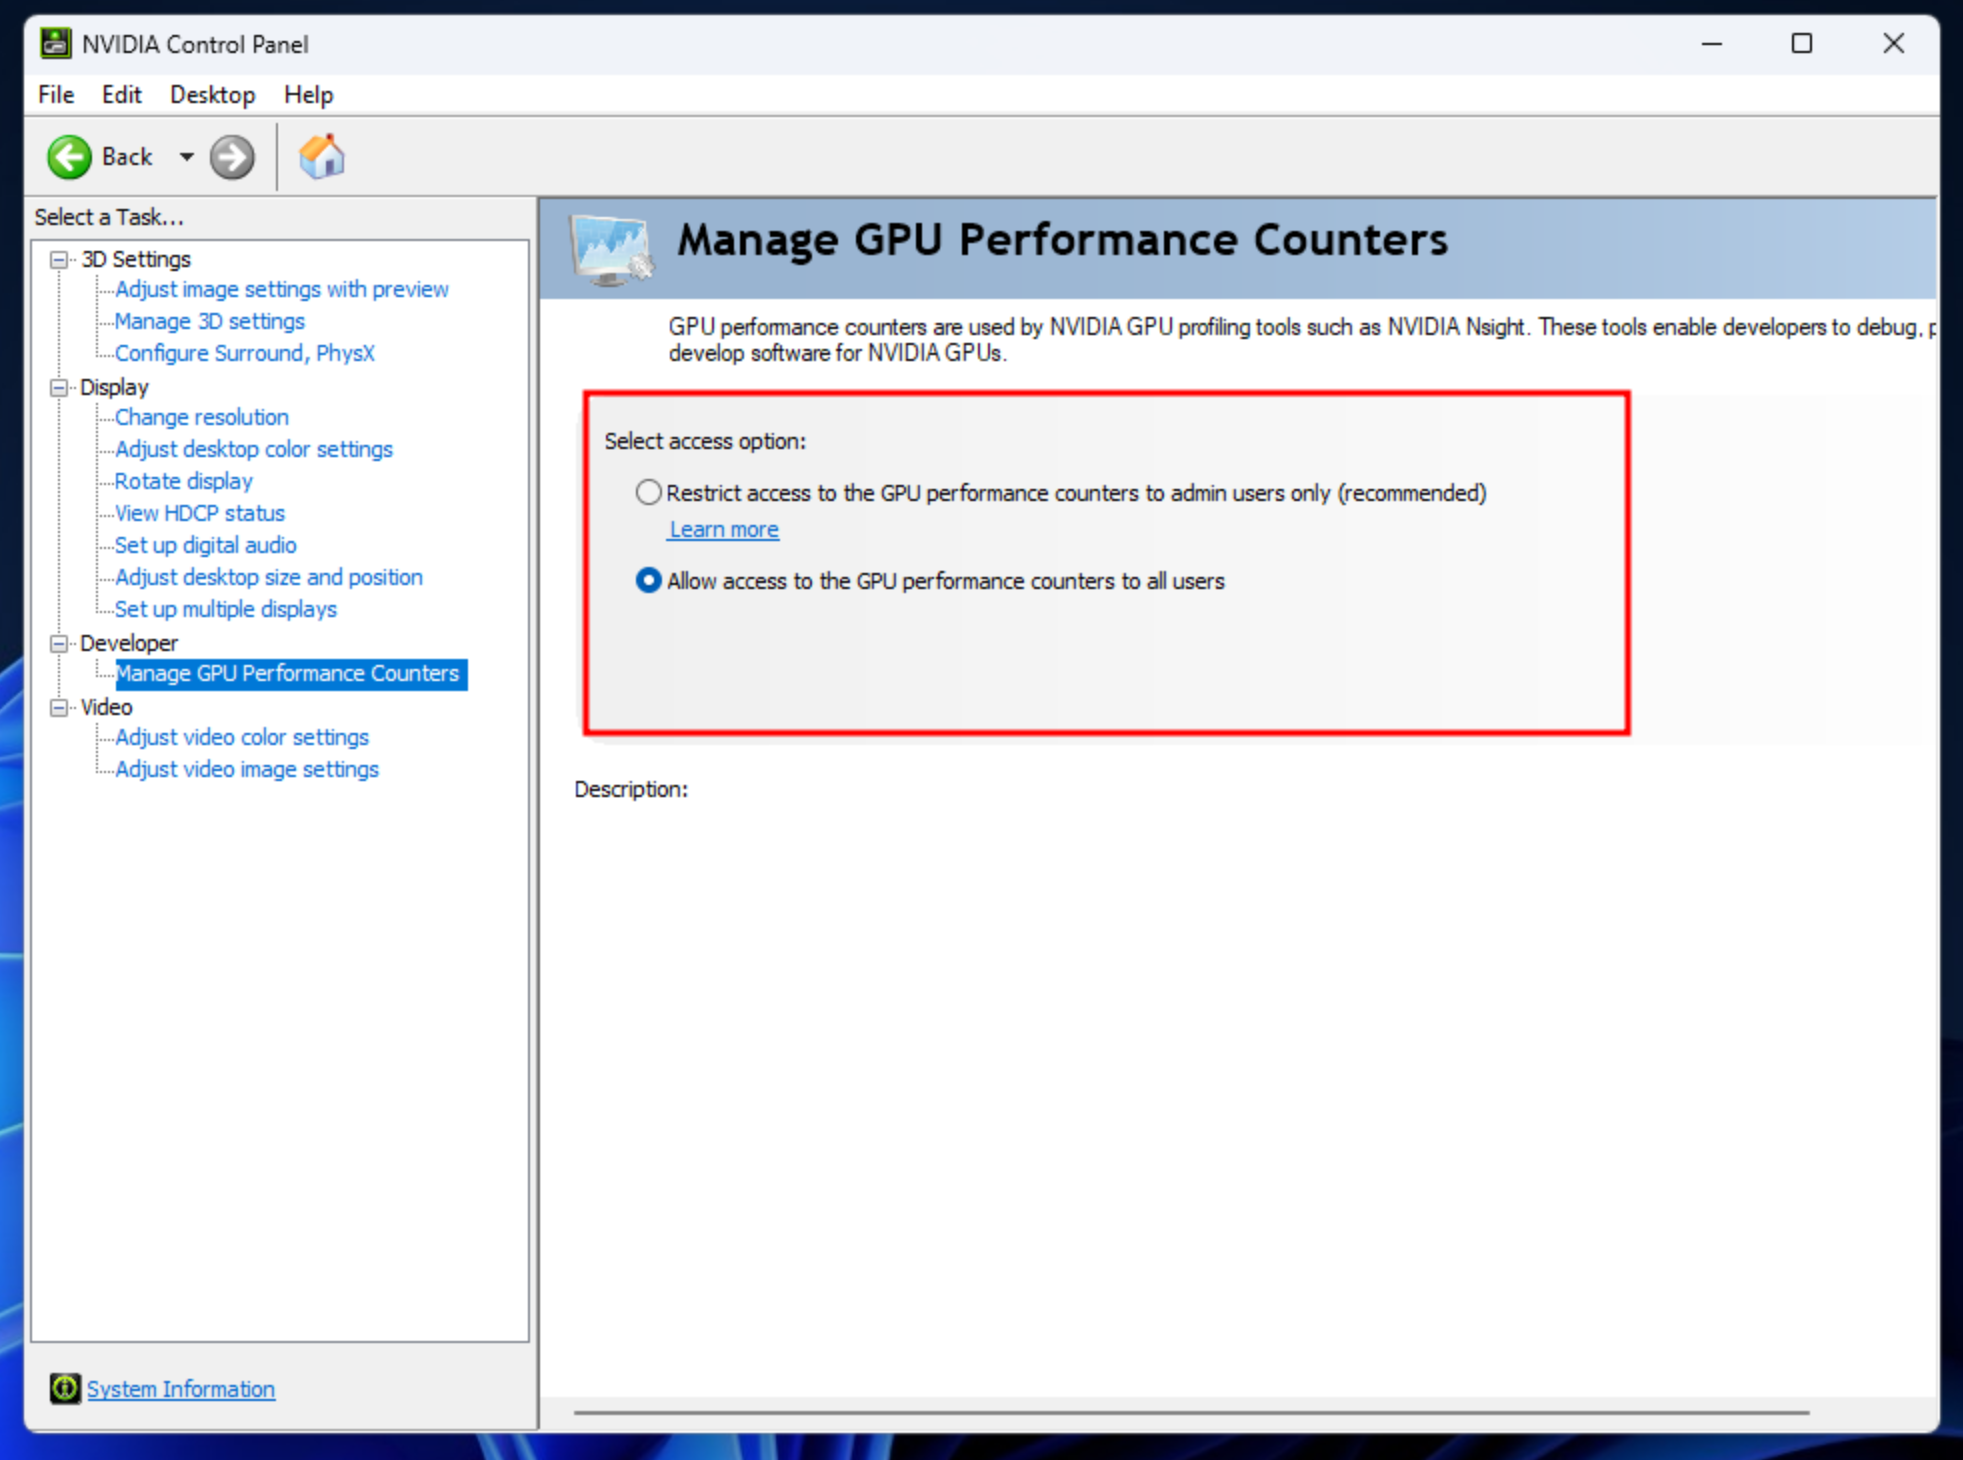
Install PyTorch from the official website of PyTorch, and enable the Nvidia Developer Settings for using CUDA via WSL, then validate CUDA from Torch.
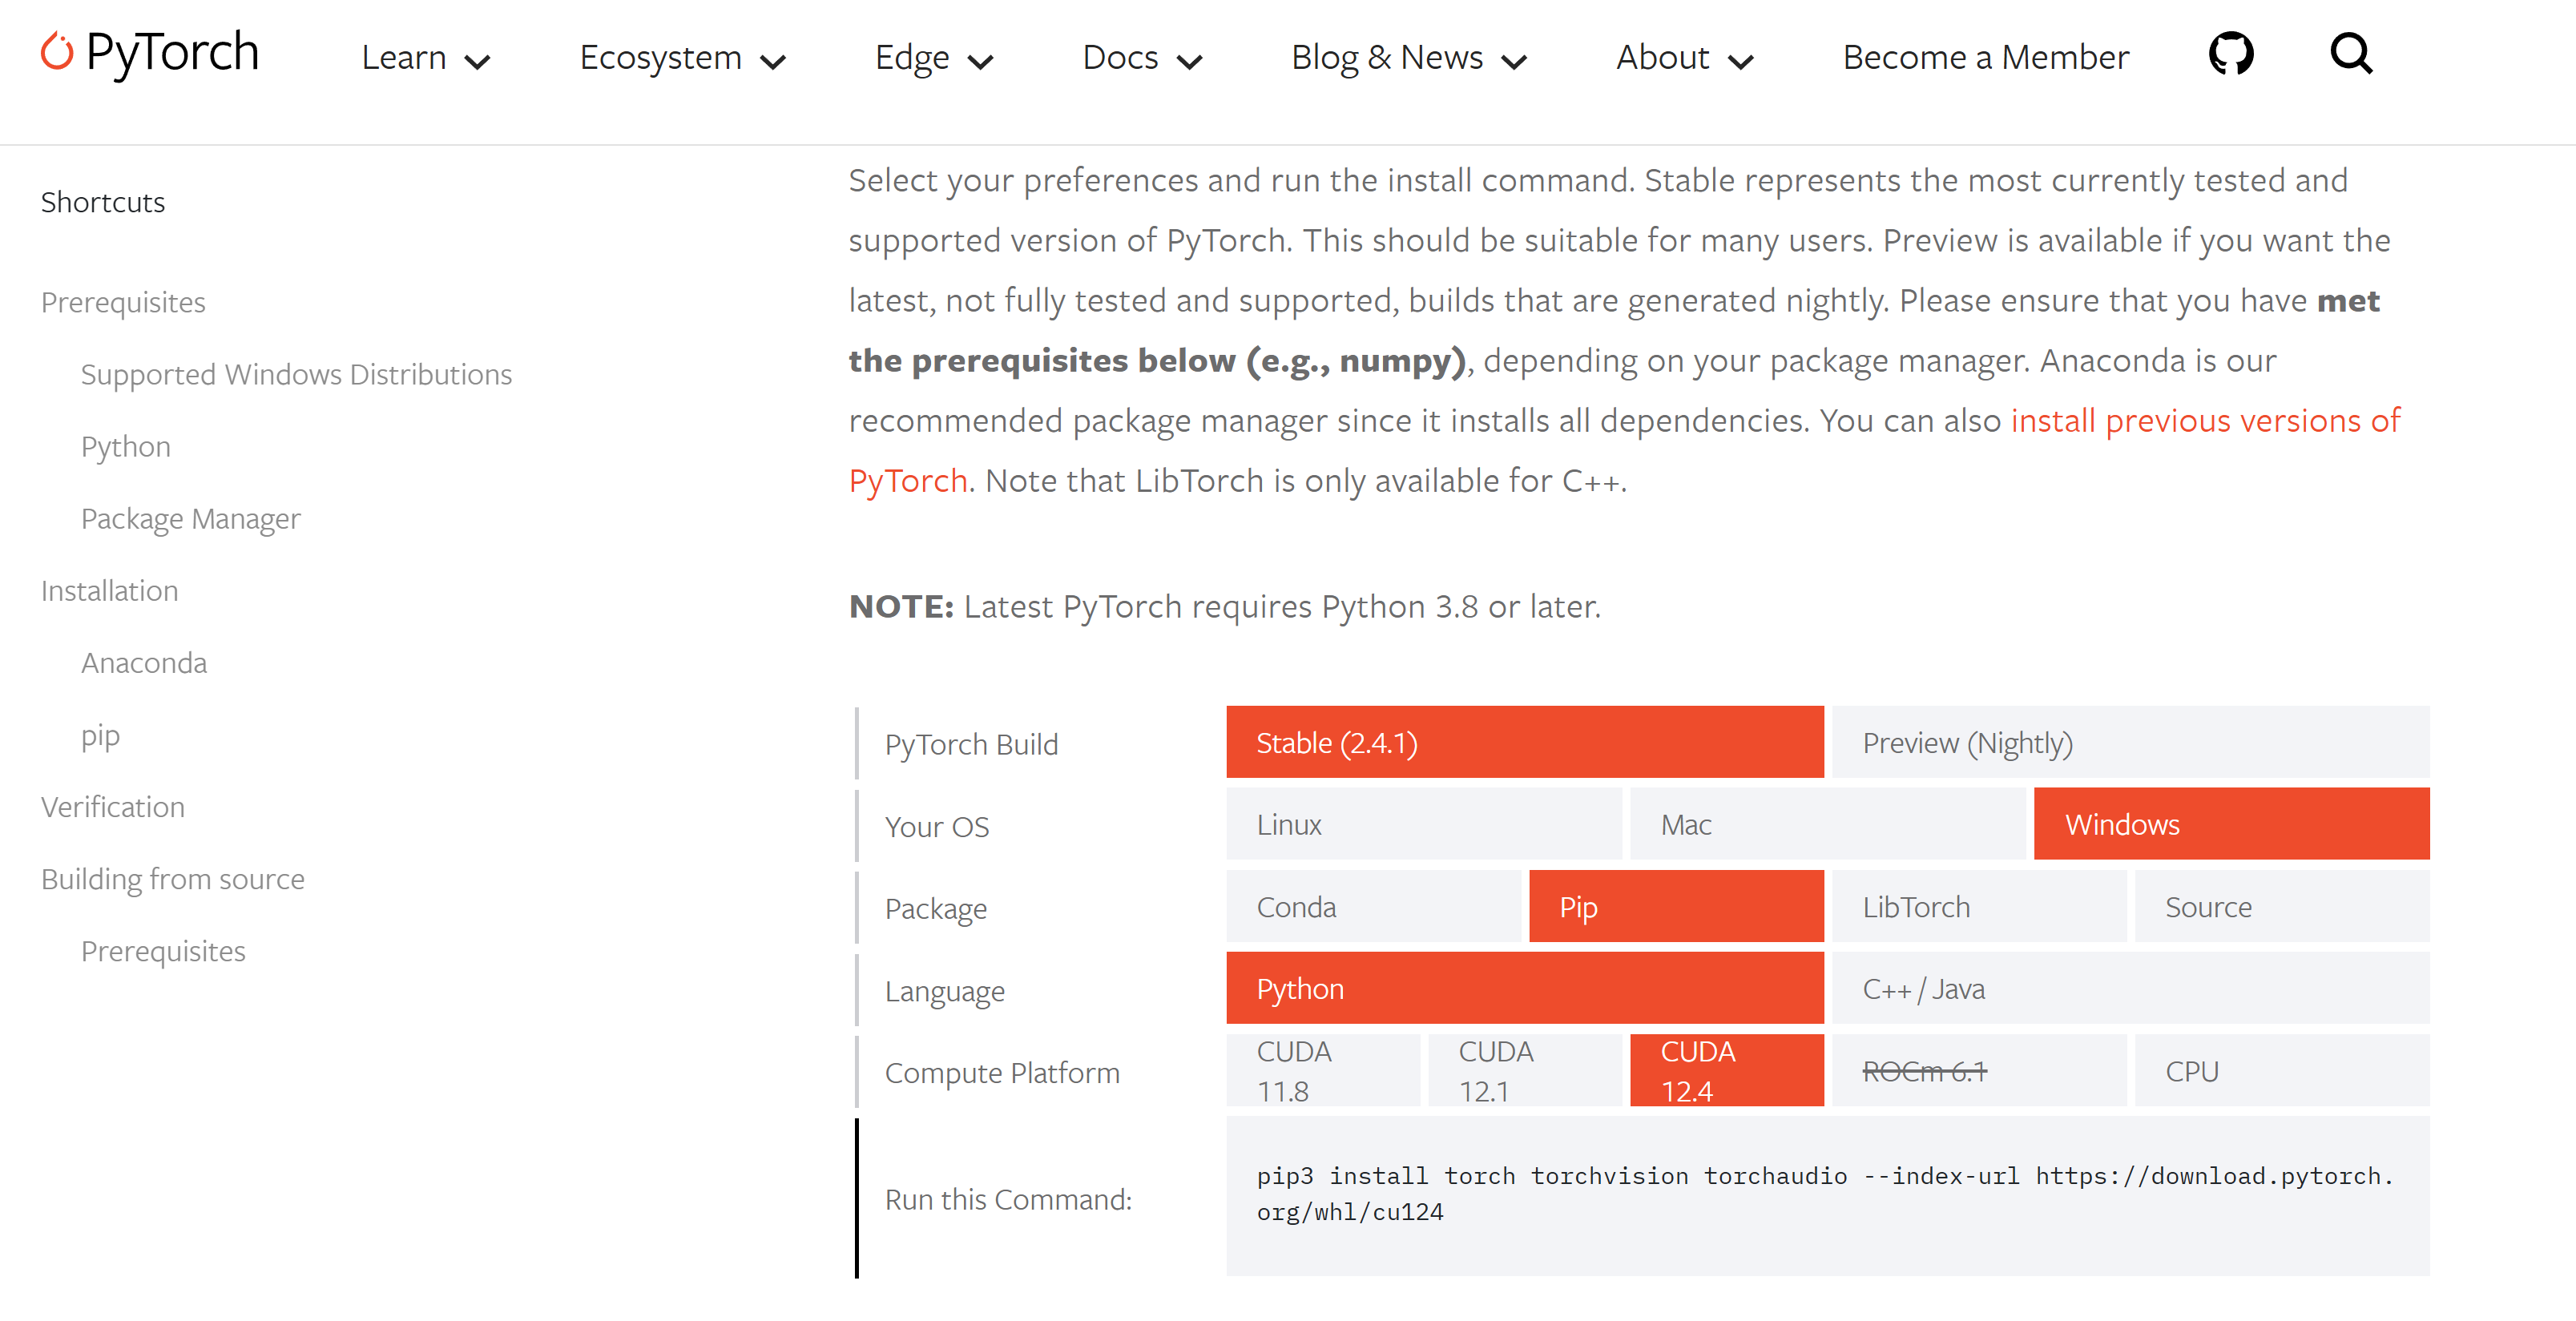
(jupyter_env)root@zackz:~# pip3 install torch torchvision torchaudio --index-url https://download.pytorch.org/whl/cu124

(jupyter_env)root@zackz:~#  python3
Python 3.12.3 (main, Sep 11 2024, 14:17:37) [GCC 13.2.0] on linux
Type "help", "copyright", "credits" or "license" for more information.
>>> import torch
ch.cuda.is_available()

True
>>>
Install Jupyter Notebook
Installing Jupyter Notebook and running it in the virtual environment, create the first notebook to verify if it is using CPU or CUDA from GPU, then run a simple notebook to have a performance comparison between CPU and GPU.
# install jupyter notebook

pip install jupyter notebook

# run  jupyter notebook in the virtual env

(jupyter_env) root@zackz:~# jupyter notebook  --allow-root
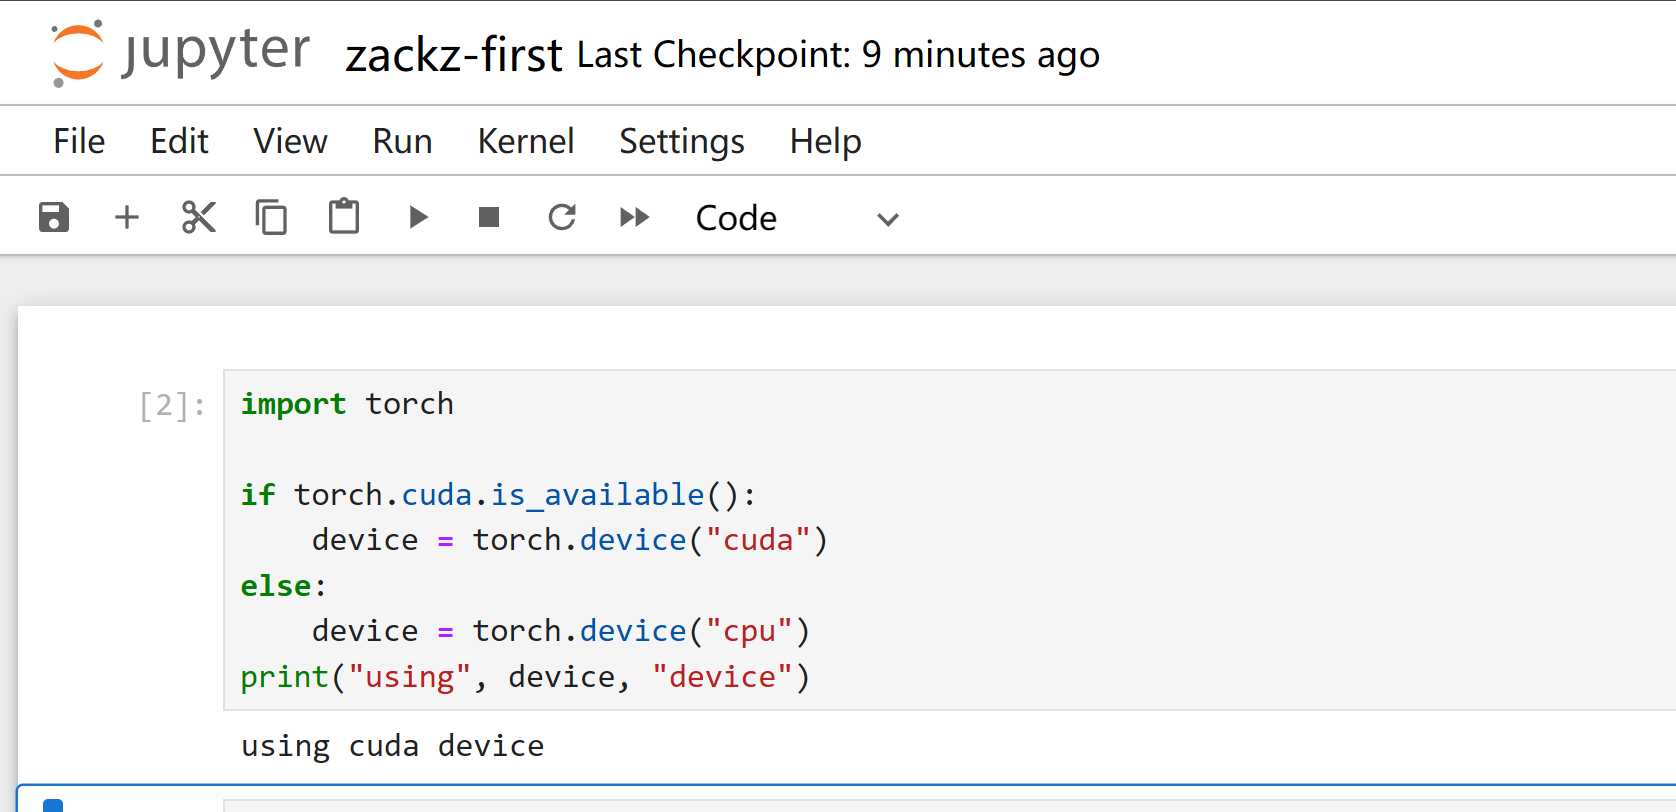
Verify Torch with CUDA device
import torch

if torch.cuda.is_available():
 device = torch.device("cuda")
else:
 device = torch.device("cpu")
print("using", device, "device")
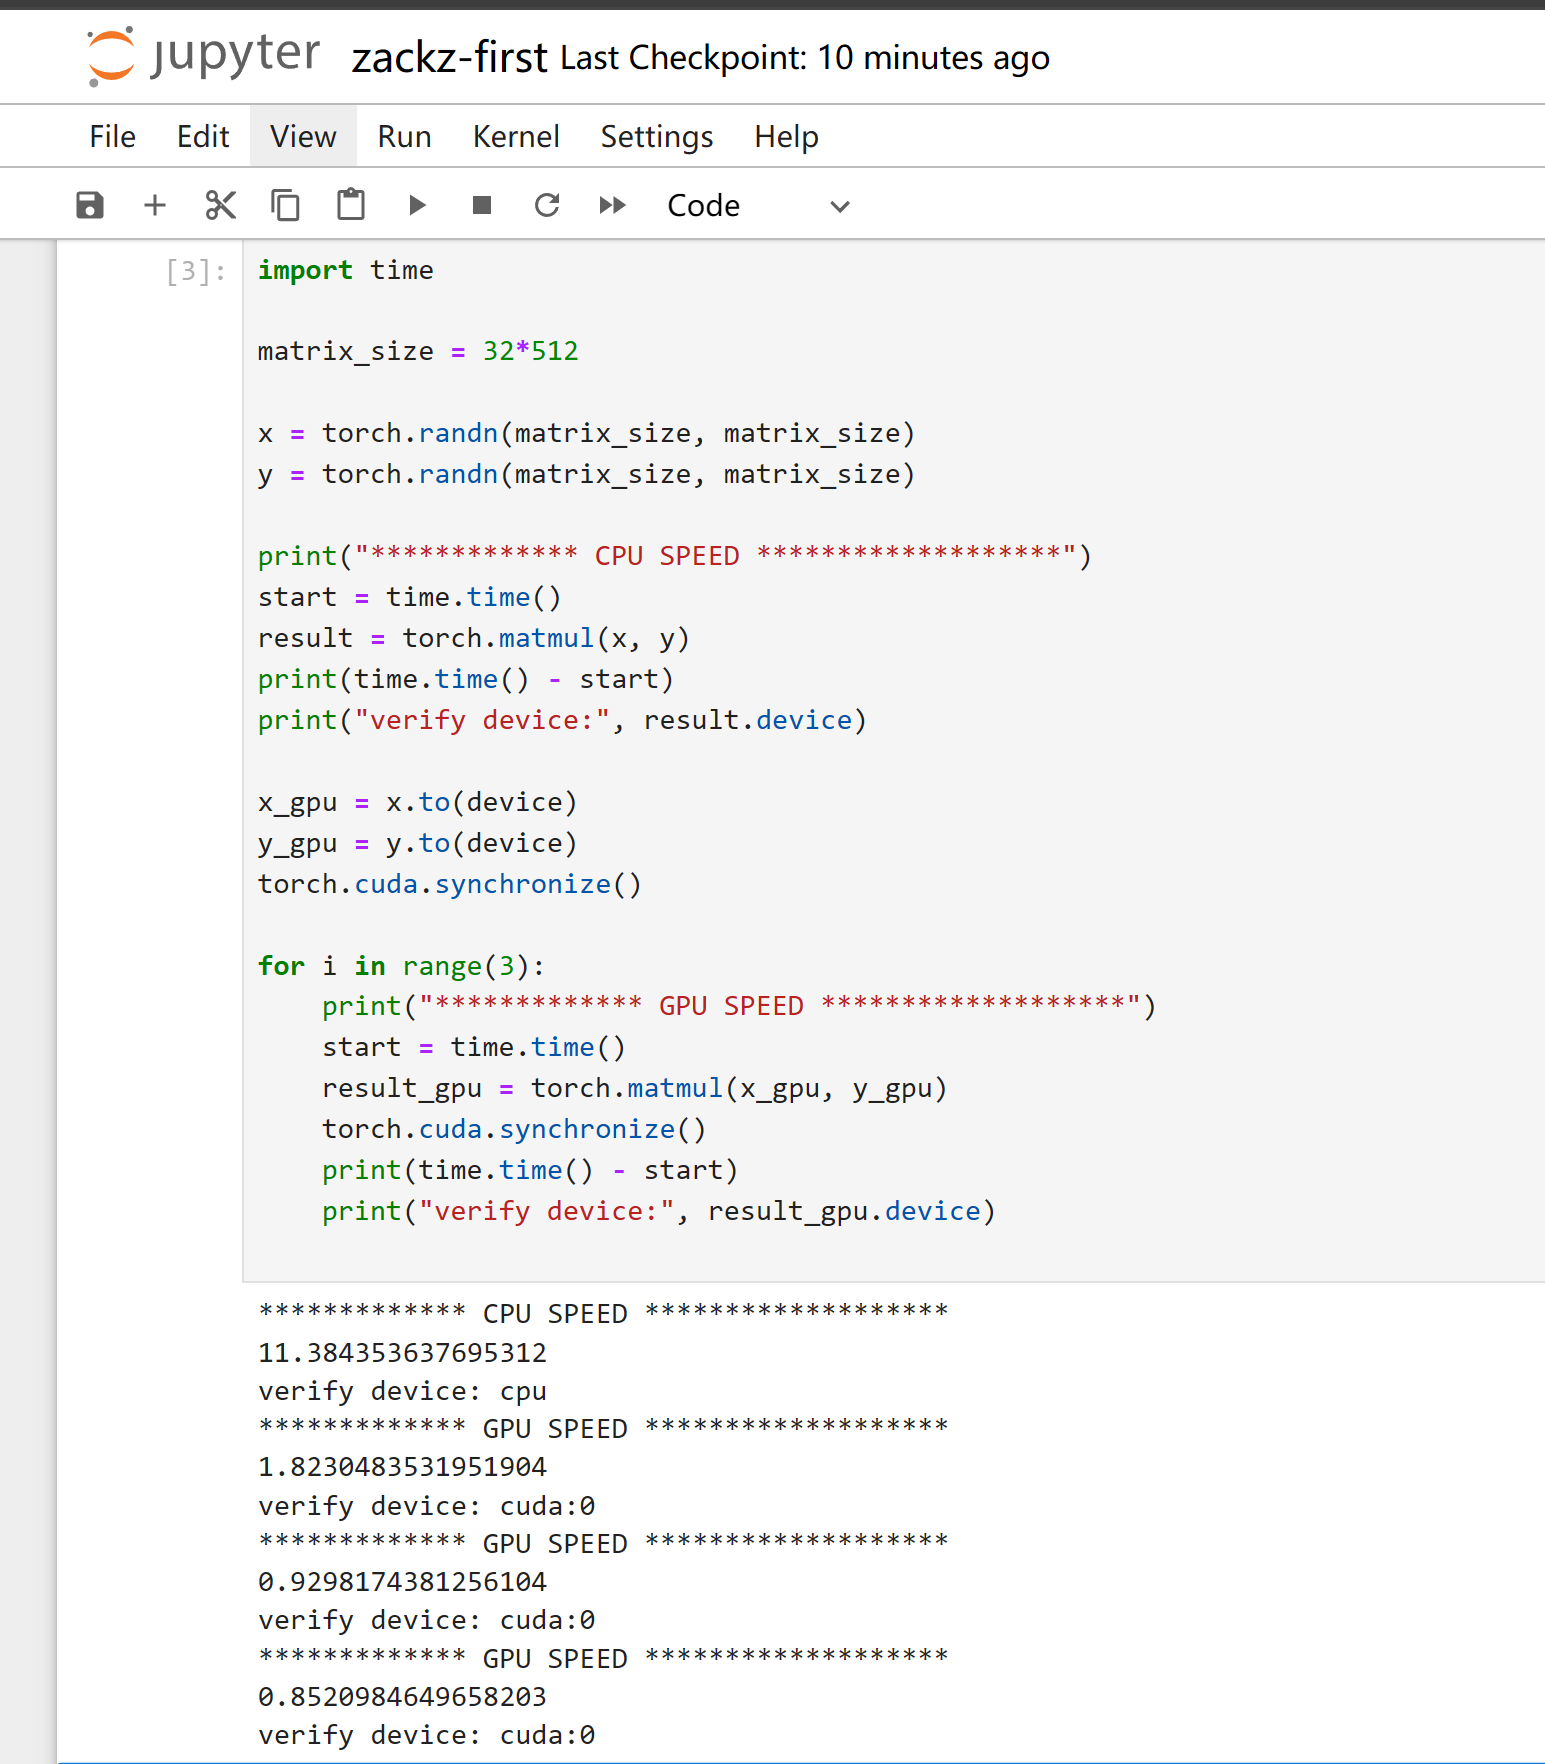
Run performance comparison between my CPU and GPU (CUDA)
import time

matrix_size = 32*512

x = torch.randn(matrix_size, matrix_size)
y = torch.randn(matrix_size, matrix_size)

print("************* CPU SPEED *******************")
start = time.time()
result = torch.matmul(x, y)
print(time.time() - start)
print("verify device:", result.device)

x_gpu = x.to(device)
y_gpu = y.to(device)
torch.cuda.synchronize()

for i in range(3):
 print("************* GPU SPEED *******************")
 start = time.time()
 result_gpu = torch.matmul(x_gpu, y_gpu)
 torch.cuda.synchronize()
 print(time.time() - start)
 print("verify device:", result_gpu.device)
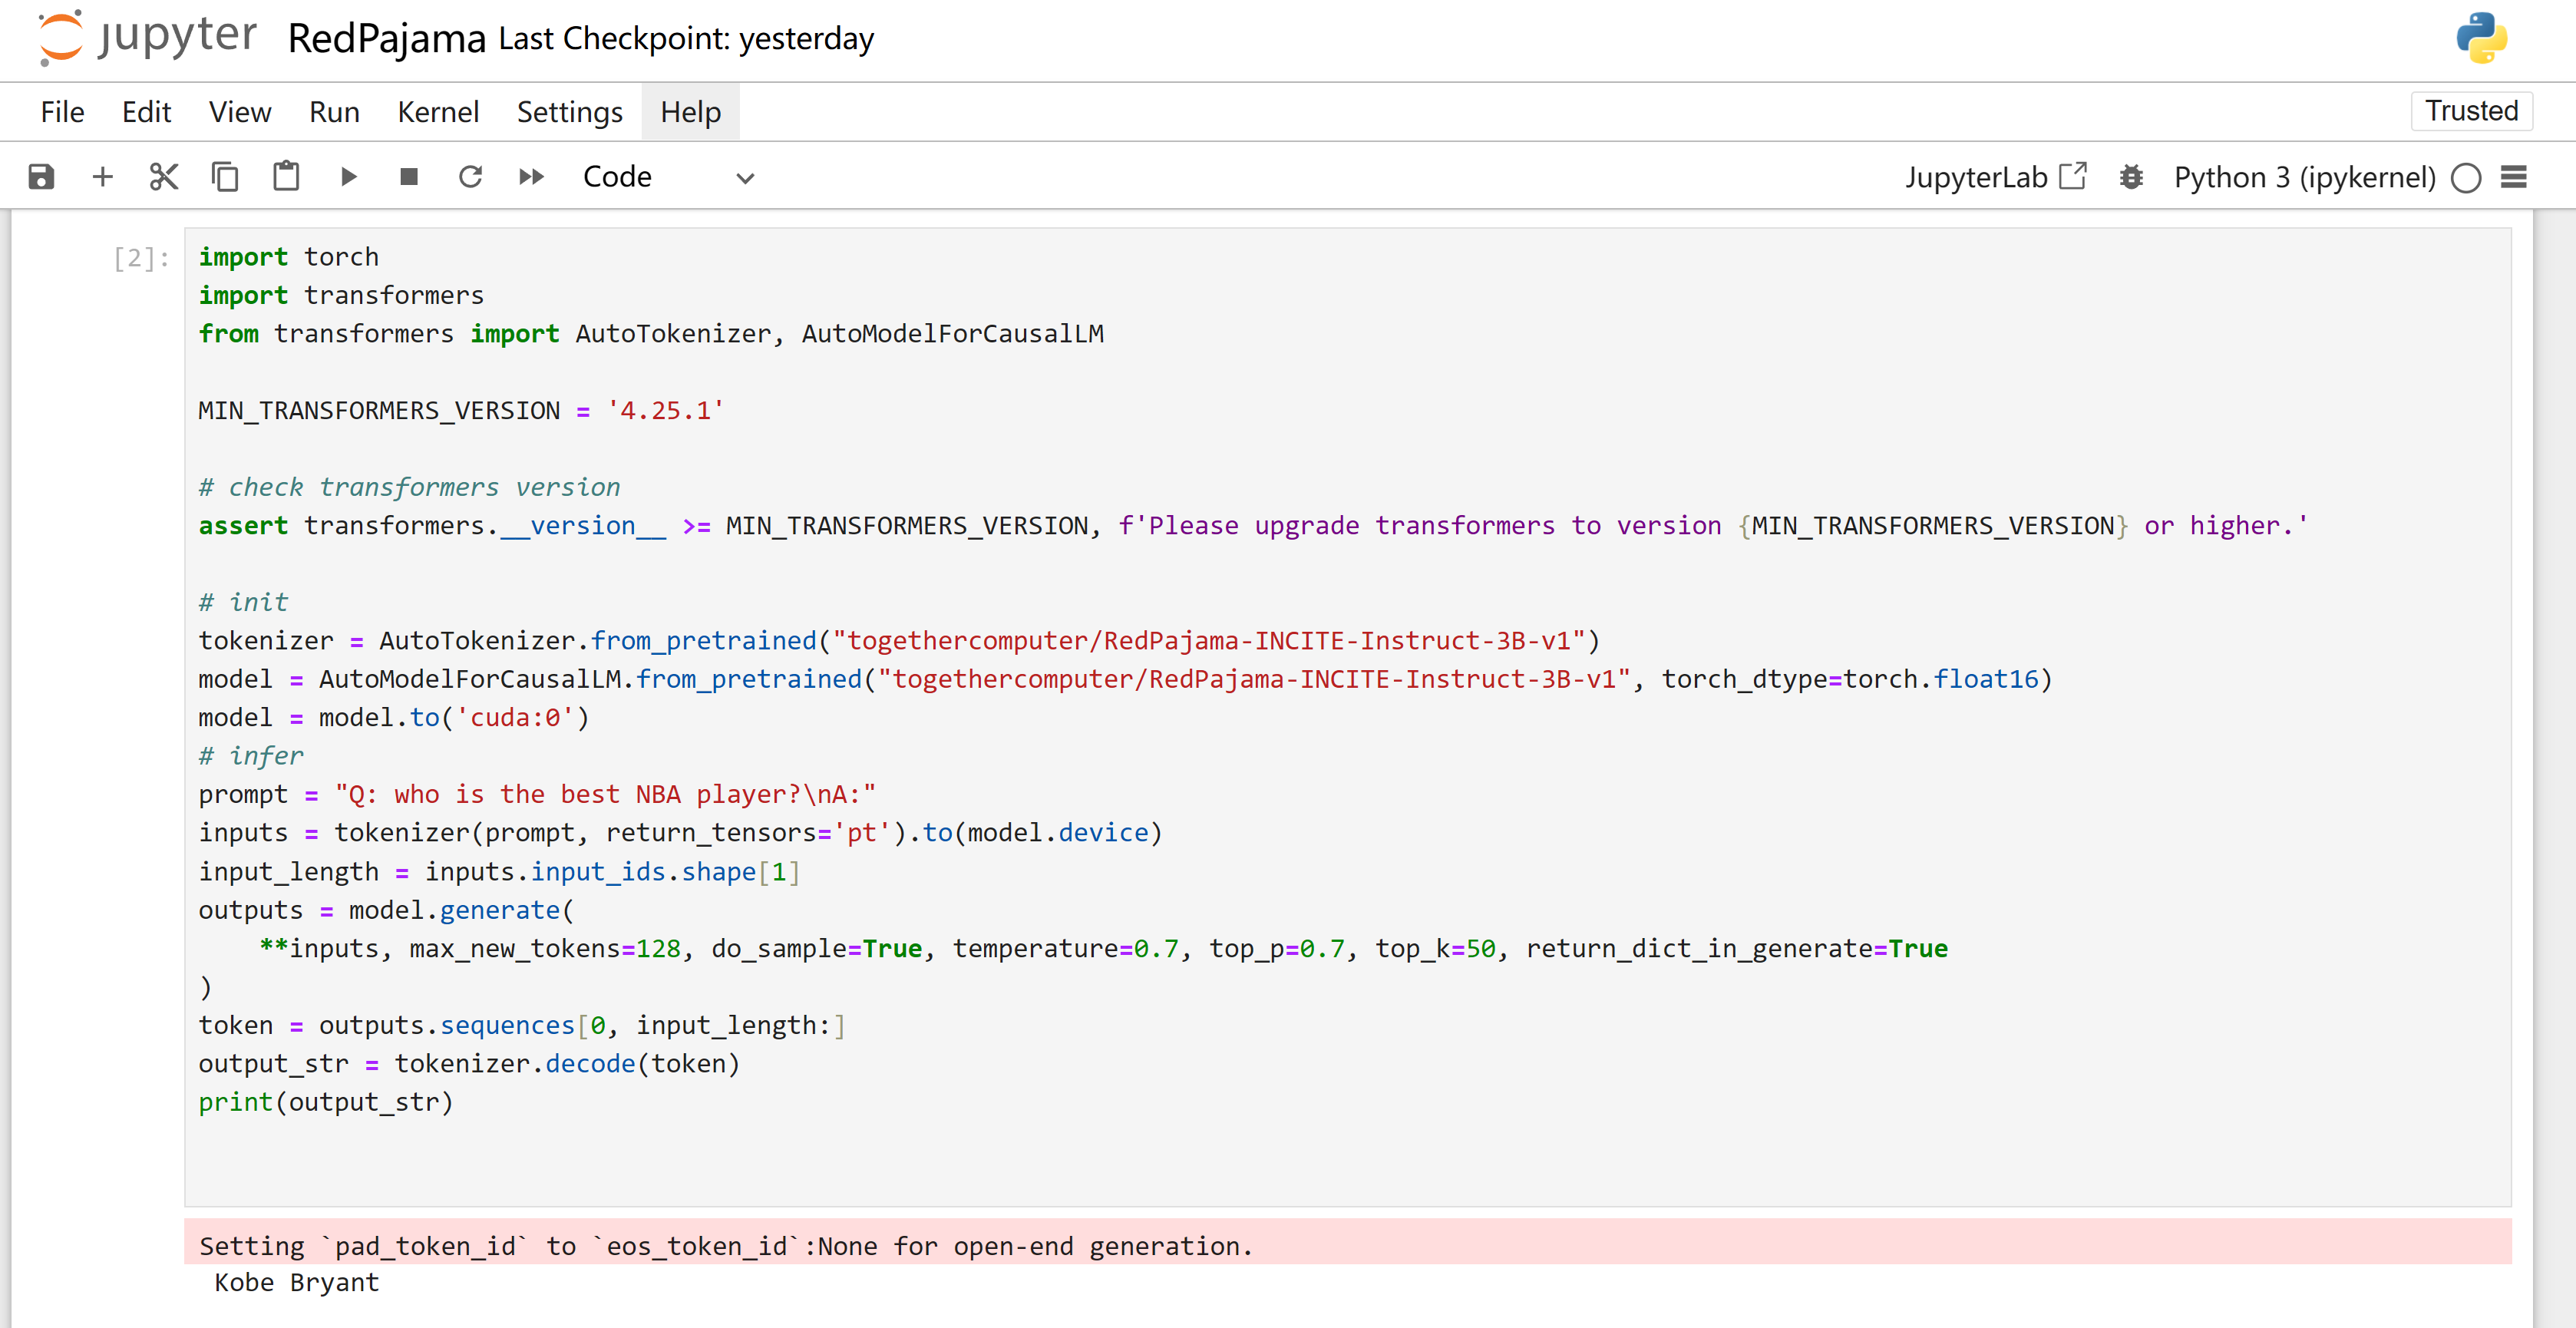
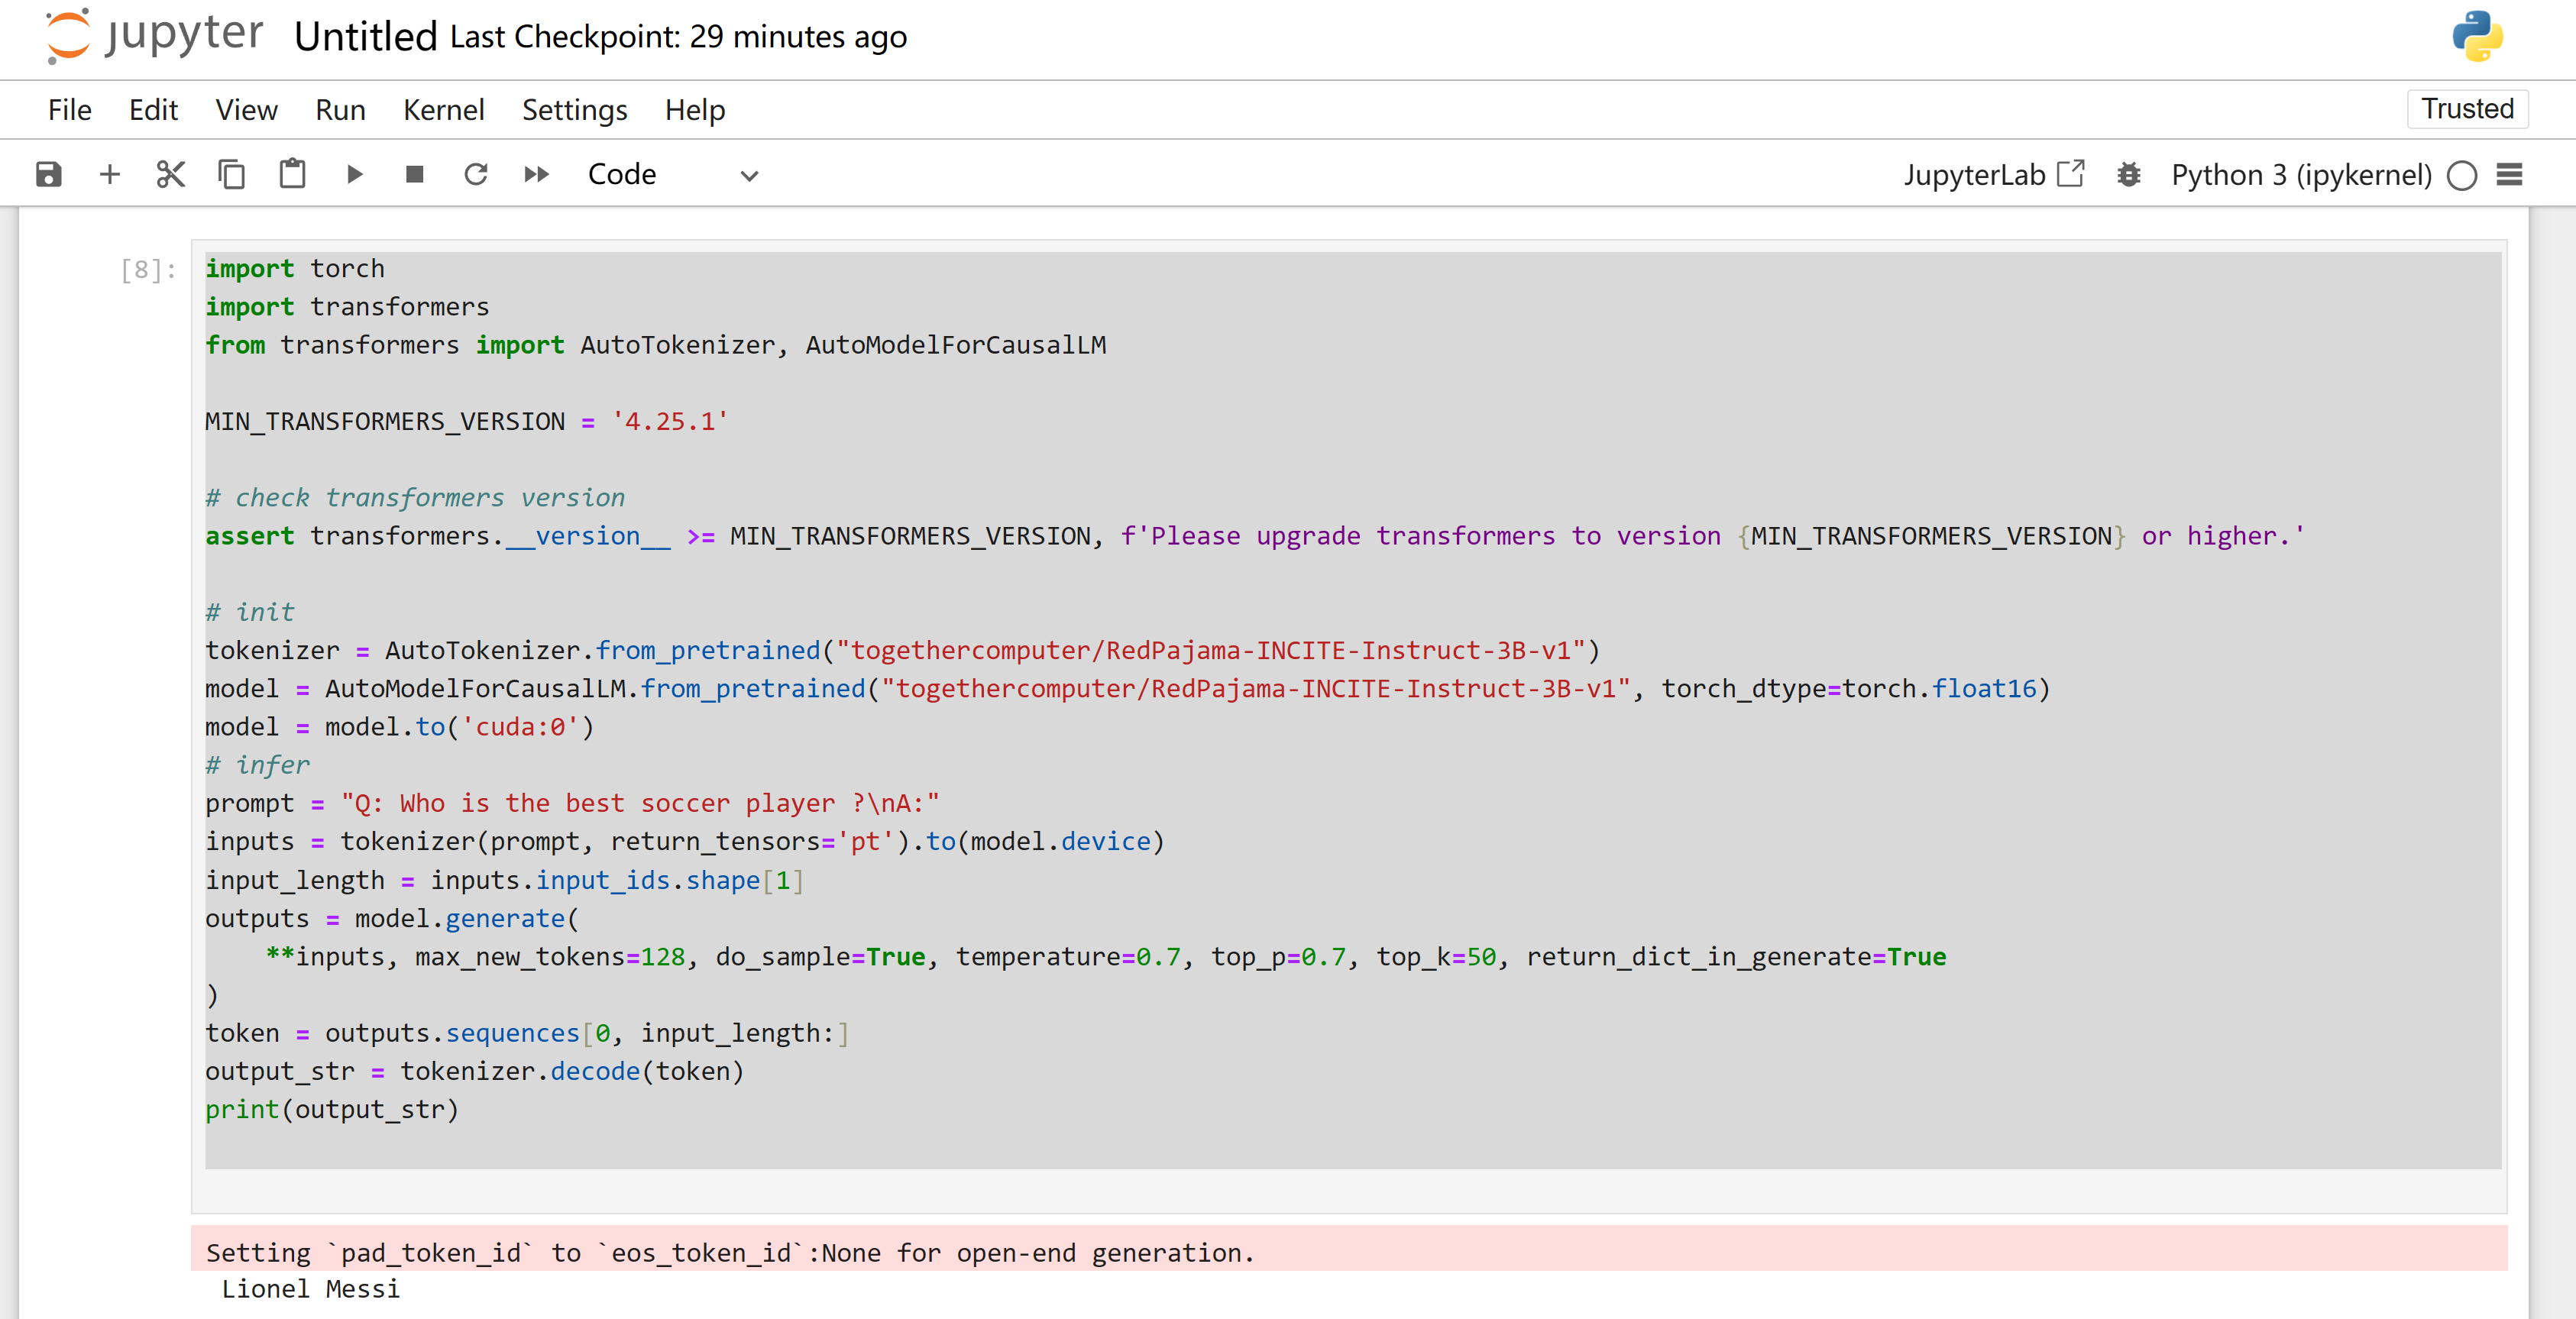
Here I run a pretrained model `RedPajama`, ask questions from prompt, the 2nd answer just killing me :)
import torch
import transformers
from transformers import AutoTokenizer, AutoModelForCausalLM

MIN_TRANSFORMERS_VERSION = '4.25.1'

# check transformers version
assert transformers.__version__ >= MIN_TRANSFORMERS_VERSION, f'Please upgrade transformers to version {MIN_TRANSFORMERS_VERSION} or higher.'

# init
tokenizer = AutoTokenizer.from_pretrained("togethercomputer/RedPajama-INCITE-Instruct-3B-v1")
model = AutoModelForCausalLM.from_pretrained("togethercomputer/RedPajama-INCITE-Instruct-3B-v1", torch_dtype=torch.float16)
model = model.to('cuda:0')
# infer
prompt = "Q: who is the best soccer player?\nA:"
inputs = tokenizer(prompt, return_tensors='pt').to(model.device)
input_length = inputs.input_ids.shape[1]
outputs = model.generate(
    **inputs, max_new_tokens=128, do_sample=True, temperature=0.7, top_p=0.7, top_k=50, return_dict_in_generate=True
)
token = outputs.sequences[0, input_length:]
output_str = tokenizer.decode(token)
print(output_str)
Conclusion
Here I have successfully set up a local machine learning lab environment, and installed ML tools on local Windows using WSL2. Next stage we will try to run a local ML module and containerize it into a Docker image.