
RedHat Identity Management (IdM) with AD Integration
When a company faces challenge to manage its Linux environments across local and public cloud, RedHat Identity management can be the solution to achieve:
- With Local AD and Azure AD (AAD) Integration
- With AWS SSO Integration as external identity provider
- LDAP, Kerberos and NTP
- A web-based management front-end running on Apache
A Typical AD User Authentication Flow End-to-End:
User Creation and Management:
- Azure AD / Local AD: Users are created in the Azure Active Directory or local Active Directory.
- Synchronization to RedHat IdM: The users are synchronized from AD to RedHat IdM using the two-way trust established between AD and IdM.
Accessing EC2 Instances via SSH:
- User Sync to RedHat IdM: Users synchronized to RedHat IdM are assigned roles and permissions, including SSH access to specific EC2 instances.
- Host-Based Access Control (HBAC): RedHat IdM enforces HBAC rules to control which users can access specific EC2 instances.
- SSH Access Control: When a user attempts to SSH into an EC2 instance, RedHat IdM verifies the user's identity and permissions, allowing or denying access based on the defined HBAC rules.
The design:
For Idm on AWS, configure the security groups to allow ports required by IdM. IdM desires below to be open:
- HTTP/HTTPS — 80, 443 — TCP
- LDAP/LDAPS — 389, 636 — TCP
- Kerberos — 88, 464 — Both TCP and UDP
- DNS — 53 — Both TCP and UDP
- NTP — 123 — UDP
Here I am going to:
- install and configure a local freeIPA server
- enroll 2 Linux client machines (both CentOS and Ubuntu)
- Setup a local AD,
- build a 2 way trust between idm and AD
- Validate IDM and AD user to ssh into idm client machines.
Prerequisites:
- Windows AD Domain ad.zack.world and Idm Domain ipa.zack.world
- Windows AD: 11.0.1.181 dc01.ad.zack.world (win server 2019)
- Windows client1: 11.0.1.182 win-client.ad.zack.world (win server 2019)
- idm Server: 11.0.1.180 server1.ipa.zack.world (CentOS 9)
- idm Client2: 11.0.1.184 ubt-client02.ipa.zack.world (Ubuntu 24.04)
- idm Client3: 11.0.1.185 idm-client3-centos7.ipa.zack.world (CentOS 9)
FreeIPA Installation
On freeIPA Server server1.ipa.zack.world 11.0.1.180 (CentOS 9):
# set hostname, IP and DNS
hostnamectl set-hostname server1.ipa.zack.world
# add 3 hosts to /etc/hosts
echo 11.0.1.180 server1.ipa.zack.world ipa >> /etc/hosts
echo 11.0.1.184 ubt-client02.ipa.zack.world ipa >> /etc/hosts
echo 11.0.1.185 idm-client3-centos7.ipa.zack.world ipa >> /etc/hosts
echo 11.0.1.181 dc01.ad.zack.world ipa >> /etc/hosts
# install ipa-server
dnf -y install freeipa-server freeipa-server-dns freeipa-client
# Configure ipa-server and DNS, here set ipa console and domain admin password
ipa-server-install --setup-dns
# confirm or change NetBIOS domain name
NetBIOS domain name [IPA]: IPA01
The ipa-server-install command was successful.
# Configure firewall rules and services
firewall-cmd --add-service={freeipa-ldap,freeipa-ldaps,dns,ntp}
firewall-cmd --runtime-to-permanent
firewall-cmd --reload
# check ipastatus
[root@freeipa ~]# ipactl status
Directory Service: RUNNING
krb5kdc Service: RUNNING
kadmin Service: RUNNING
httpd Service: RUNNING
ipa-custodia Service: RUNNING
ntpd Service: RUNNING
pki-tomcatd Service: RUNNING
ipa-otpd Service: RUNNING
ipa: INFO: The ipactl command was successful
# Obtain a Kerberos ticket for the Kerberos admin user and Verify the ticket
kinit admin
klist
Ticket cache: KEYRING:persistent:0:0
Default principal: [email protected]
Valid starting Expires Service principal
07/13/24 22:17:29 07/14/24 22:02:43 HTTP/[email protected]
# check content of /etc/resolv.conf
cat /etc/resolv.conf
search ipa.zack.world
nameserver 127.0.0.1
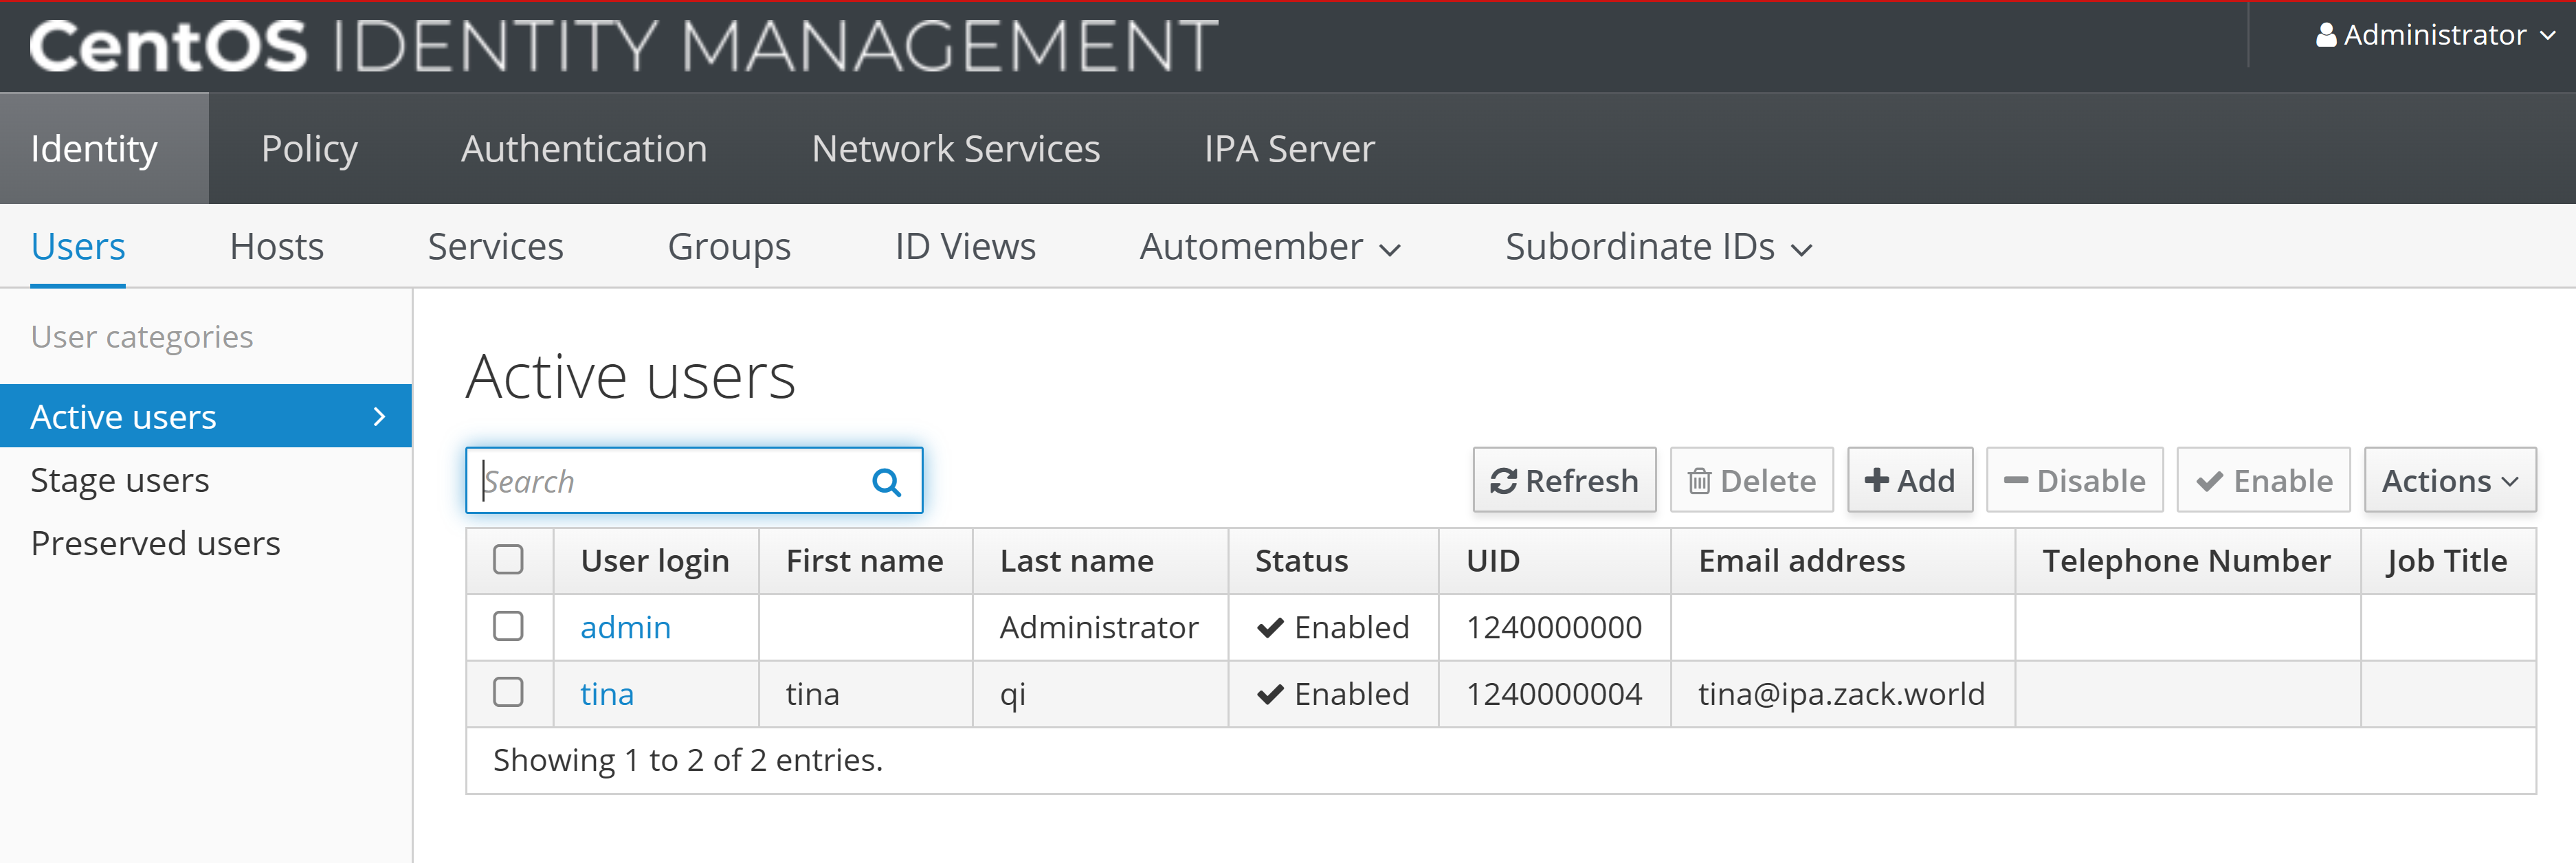
# Configure default login shell to Bash and Create User tina
ipa config-mod --defaultshell=/bin/bash
ipa user-add tina --first=tina --last=qi --password
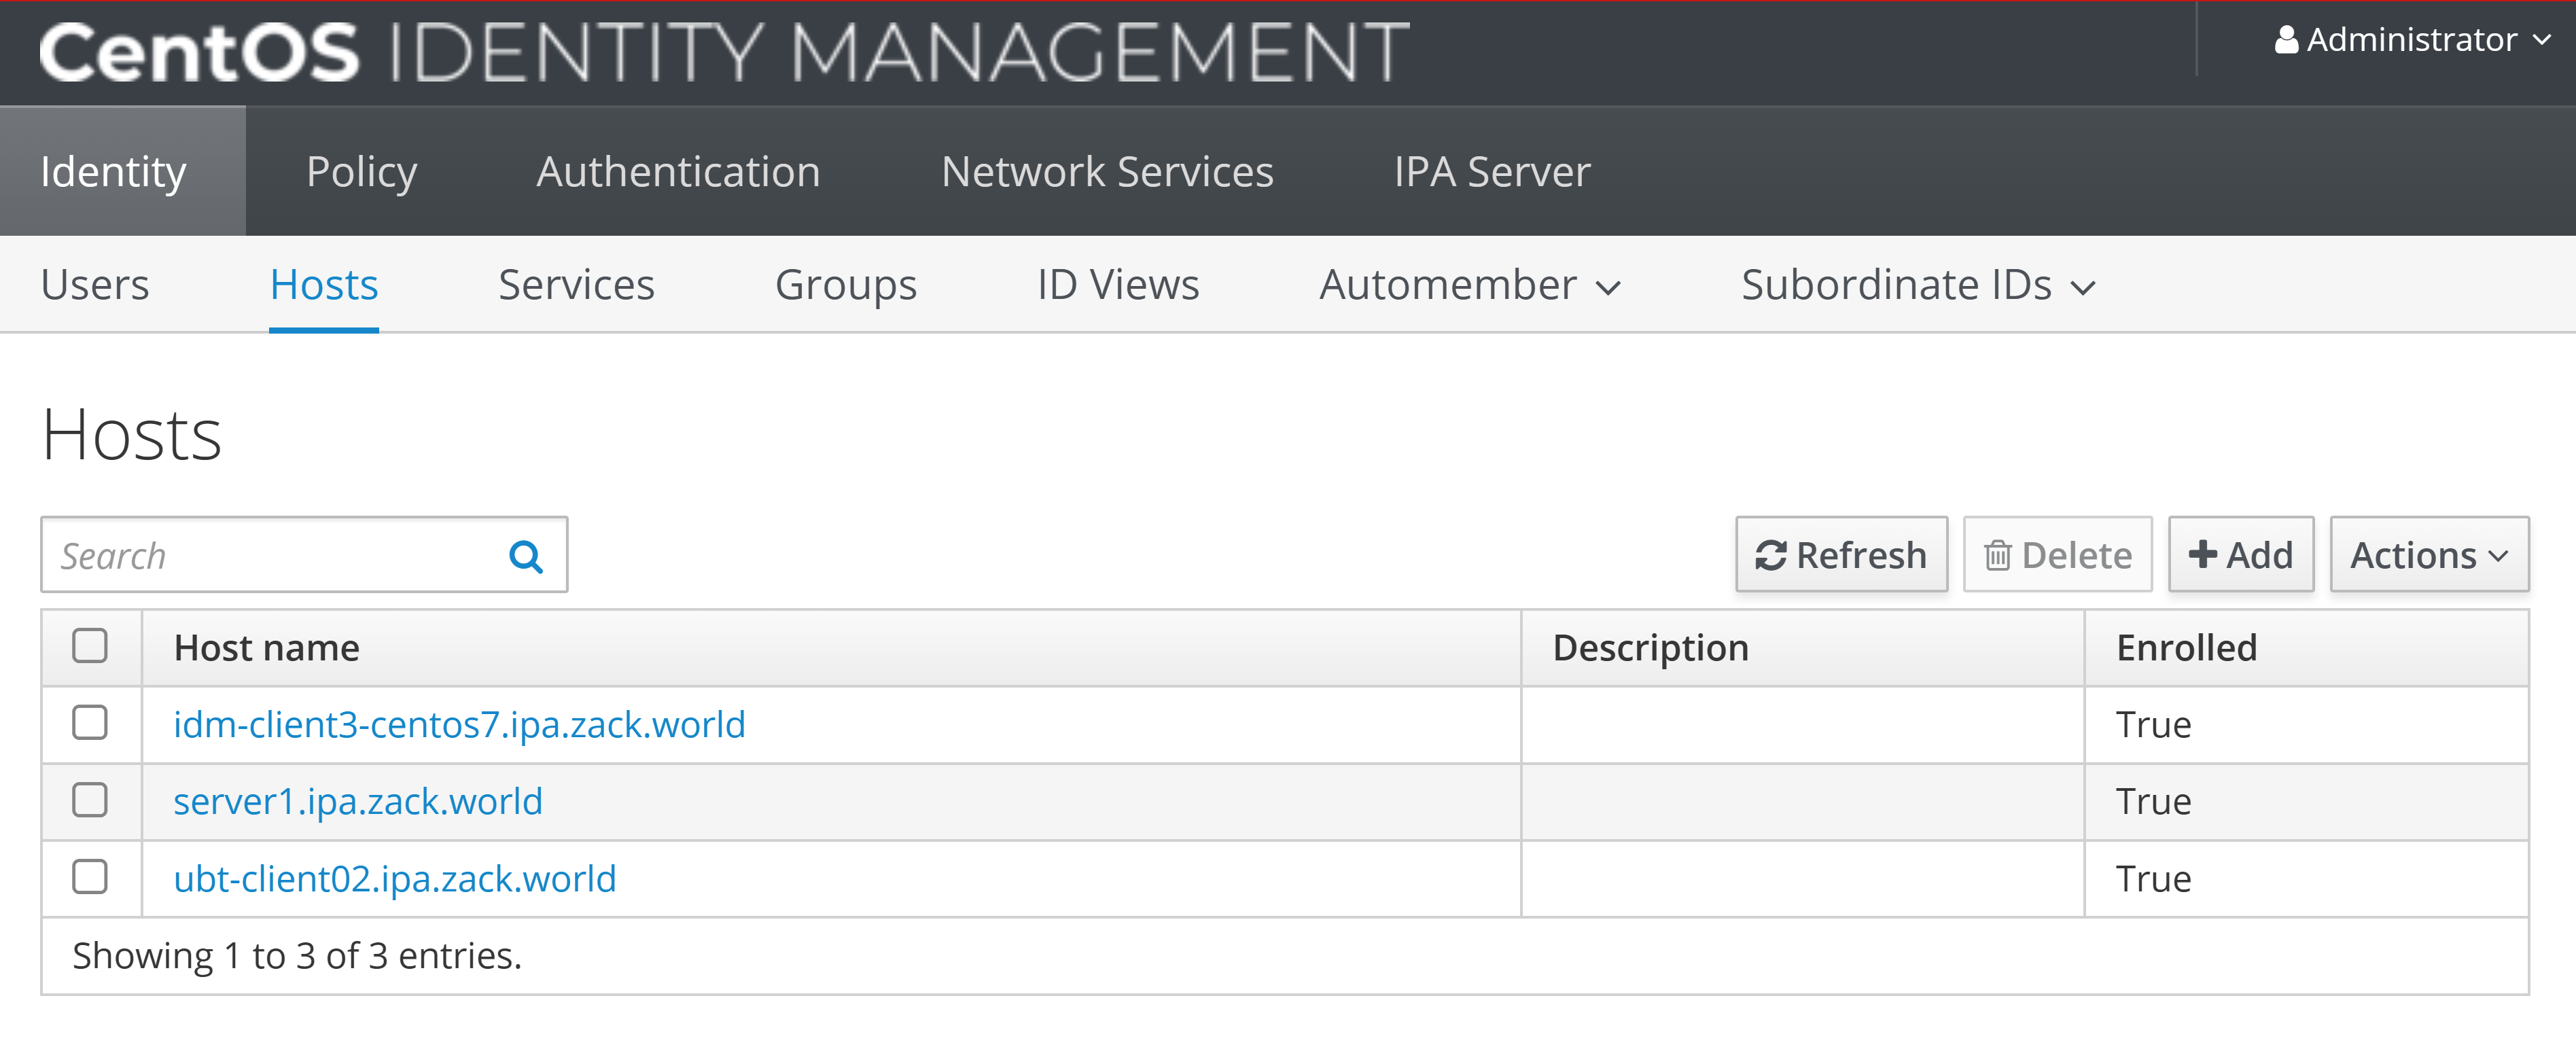
Idm client Enrollment
Now the idm web portal should be accessible, by adding "11.0.1.180 server1.ipa.zack.world" into local "c:/windows/system32/drivers/etc/hosts.
Then enrol both CentOS and Ubuntu IDM client machines
On FreeIPA Server, add DNS entry for FreeIPA Client machines
# ipa dnsrecord-add [domain name] [record name] [record type] [record]
ipa dnsrecord-add ipa.zack.world idm-client3-centos7 --a-rec 11.0.1.185
ipa dnsrecord-add ipa.zack.world ubt-client02 --a-rec 11.0.1.184

- set IP, hostname, DNS on idm client
# set idm server ID as client DNS
nmcli connection modify ens33 ipv4.dns 11.0.1.180
nmcli connection up ens33

# Install FreeIPA Client packages.
dnf -y install freeipa-client

# enrol client to idm server with domain name
ipa-client-install --server=server1.ipa.zack.world --domain ipa.zack.world

Enrolled in IPA realm IPA.ZACK.WORLD
Configuring ipa.zack.world as NIS domain.
Client configuration complete.
The ipa-client-install command was successful

# set create home directory at initial login
authselect enable-feature with-mkhomedir
systemctl enable --now oddjobd

# same as Ubuntu client
echo 11.0.1.180 server1.ipa.zack.world server1 >> /etc/hosts
echo 11.0.1.184 ubt-client02.ipa.zack.world ubt-client02 >> /etc/hosts
echo 11.0.1.185 idm-client3-centos7.ipa.zack.world idm-client3-centos7 >> /etc/hosts

# Edit host file and install client, then enrol into idm server domain
apt update && apt install freeipa-client oddjob-mkhomedir -y
ipa-client-install --server=server1.ipa.zack.world --domain ipa.zack.world

Client configuration complete.
The ipa-client-install command was successful
Setup idm and AD trust
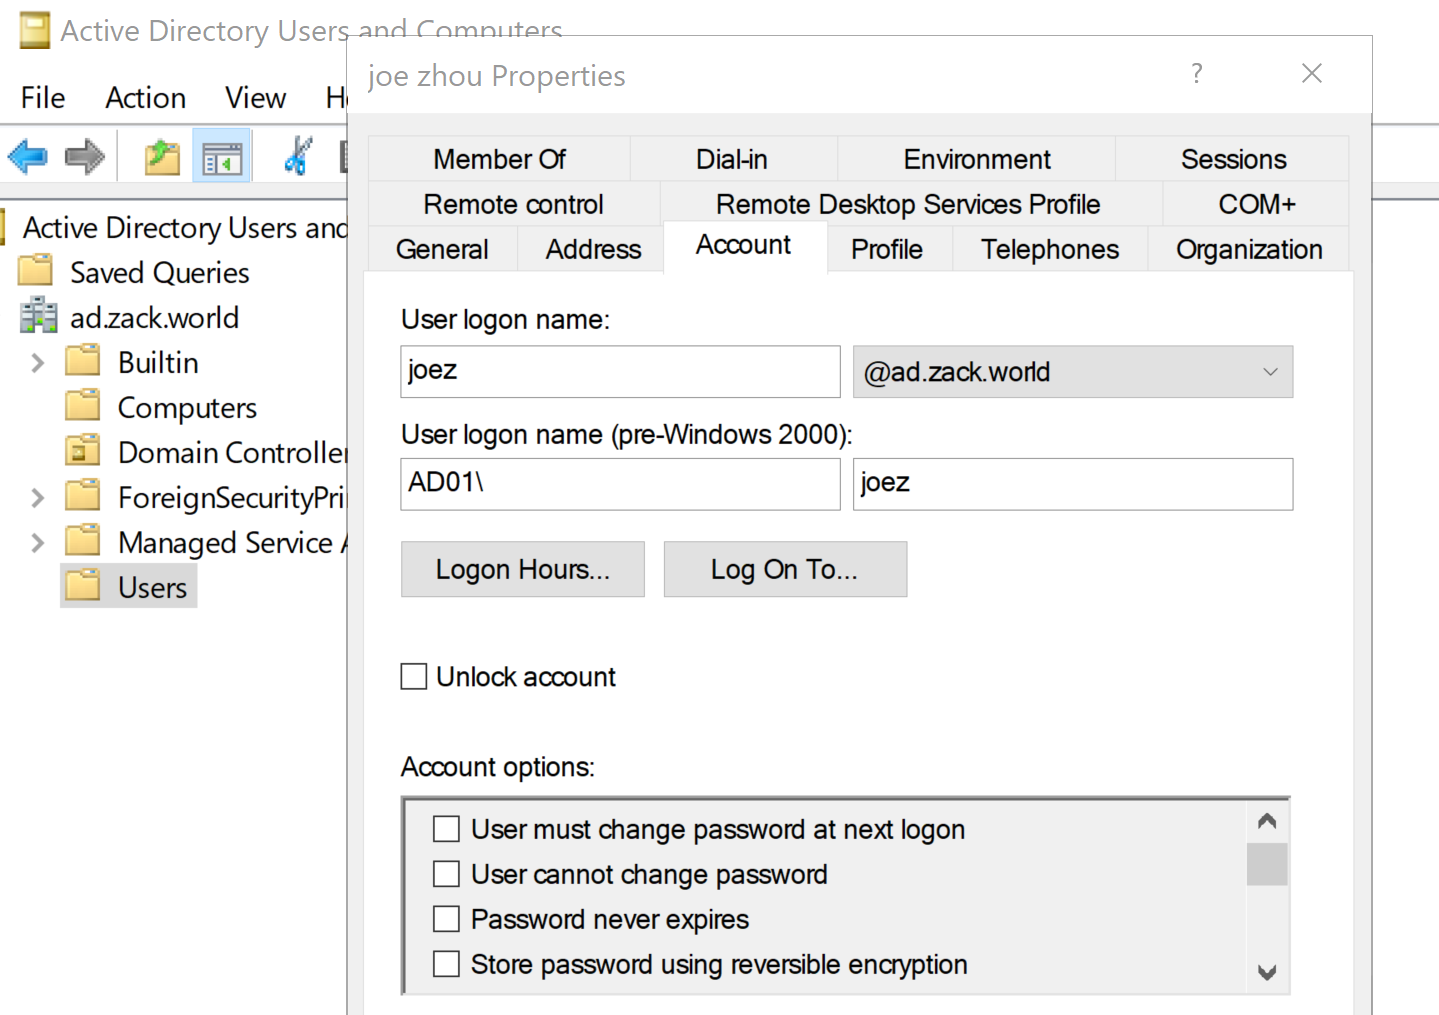
On Windows DC, setup AD
- install ADDC role and feature
- create forest "ad.zack.world"
- promote to primary DC
- test AD to join Windows client machine to domain
- create AD user [email protected]
- add idm domain to Windows AD zones
# dnscmd 127.0.0.1 /ZoneAdd [FreeIPA domain name] /Secondary [FreeIPA IP address]
C:\Users\Administrator>dnscmd 127.0.0.1 /ZoneAdd ipa.zack.world /Secondary 11.0.1.180
DNS Server 127.0.0.1 created zone ipa.zack.world:

Command completed successfully.

# Verify both AD and Idm DNS resolution, then setup trust
dig SRV _ldap._tcp.ipa.zack.world
dig SRV _ldap._tcp.ad.zack.world
Install required packages then setup trust on FreeIPA Server
# Install packages
dnf -y install ipa-server-trust-ad
# setup ad trust
ipa-adtrust-install
# FreeIPA admin password
admin password:
=============================================================================
Setup complete
# add firewall service and ports for ad trust
firewall-cmd --add-service=freeipa-trust
firewall-cmd --permanent --add-port=135/tcp
firewall-cmd --permanent --add-port=138/tcp
firewall-cmd --permanent --add-port=139/tcp
firewall-cmd --permanent --add-port=445/tcp
firewall-cmd --permanent --add-port=1024-1300/tcp
firewall-cmd --permanent --add-port=3268/tcp
# Open UDP ports
firewall-cmd --permanent --add-port=138/udp
firewall-cmd --permanent --add-port=139/udp
firewall-cmd --permanent --add-port=389/udp
firewall-cmd --permanent --add-port=445/udp
# Open TCP ports
firewall-cmd --permanent --add-port=80/tcp
firewall-cmd --permanent --add-port=443/tcp
firewall-cmd --permanent --add-port=389/tcp
firewall-cmd --permanent --add-port=636/tcp
firewall-cmd --permanent --add-port=88/tcp
sudo firewall-cmd --permanent --add-port=464/tcp
sudo firewall-cmd --permanent --add-port=53/tcp
# Open UDP ports
firewall-cmd --permanent --add-port=88/udp
firewall-cmd --permanent --add-port=464/udp
firewall-cmd --permanent --add-port=53/udp
firewall-cmd --permanent --add-port=123/udp
firewall-cmd --reload
# Configure DNS Setting on FreeIPA Server
# ipa dnsforwardzone-add [AD domain name] --forwarder=[AD IP address] --forward-policy=only
ipa dnsforwardzone-add ad.zack.world --forwarder=11.0.1.181 --forward-policy=only
# ipa dnszone-mod [IPA domain name] --allow-transfer=[AD IP address]
ipa dnszone-mod ipa.zack.world --allow-transfer=11.0.1.181
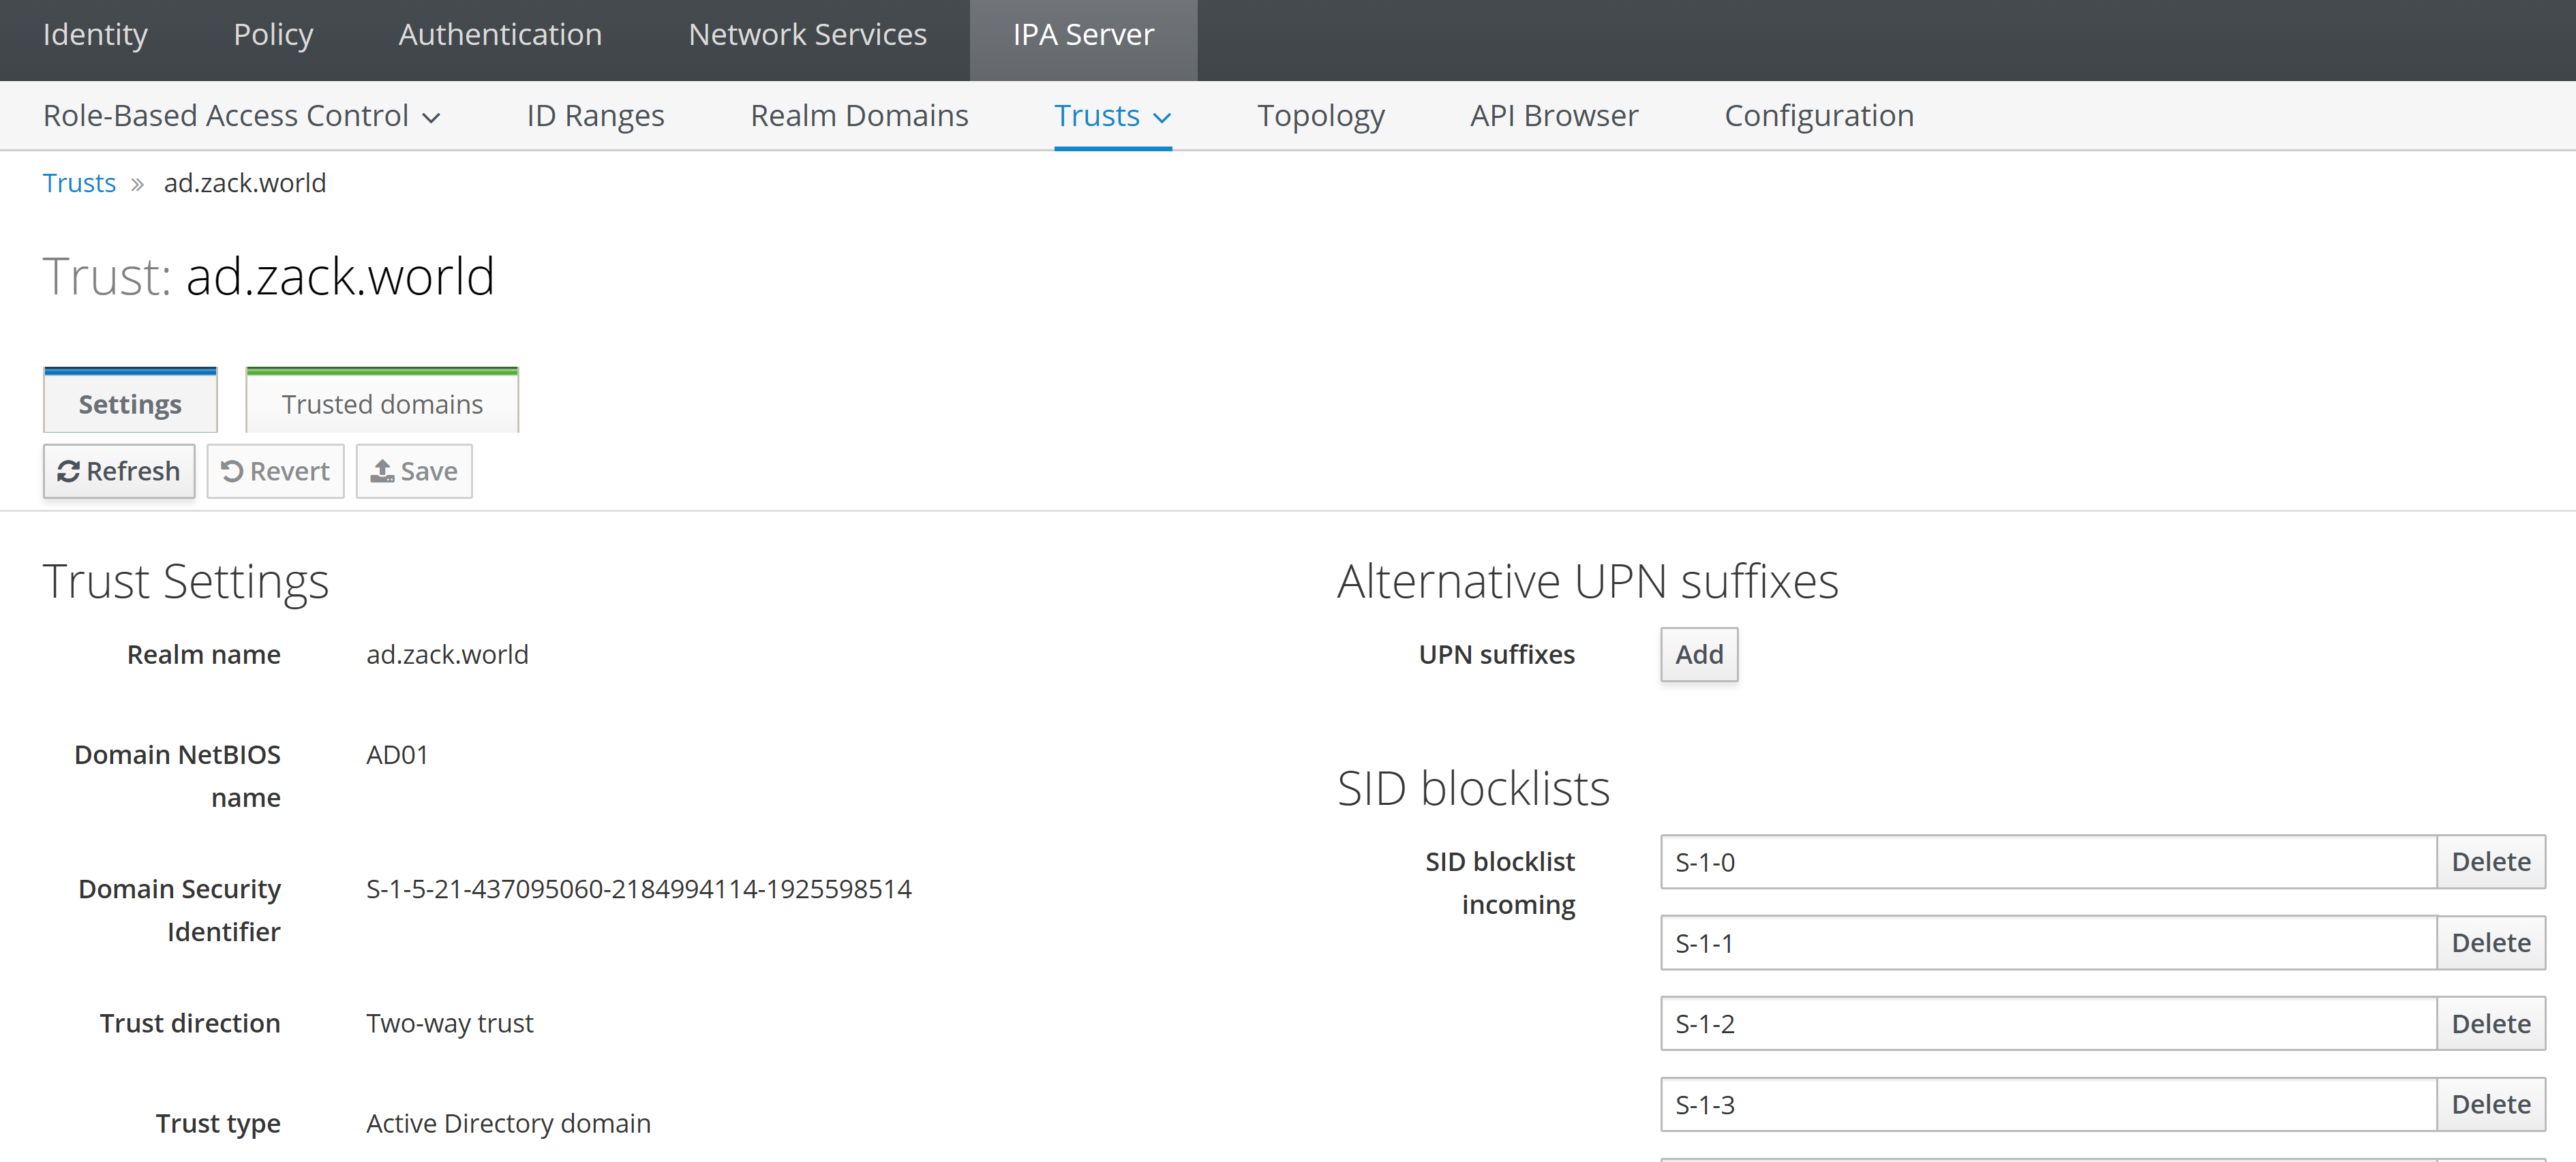
# ipa trust-add --type=ad [AD domain name] --admin Administrator --password
ipa trust-add --two-way=true --type=ad ad.zack.world --admin Administrator --password
Active Directory domain administrator's password:
-----------------------------------------------------
Added Active Directory trust for realm "ad.zack.world"
-----------------------------------------------------
Realm name: ad.zack.world
Domain NetBIOS name: AD01
Domain Security Identifier: S-1-5-21-726412840-3773945212-2352305327
Trust direction: Two-way trust
Trust type: Active Directory domain
Trust status: Established and verified
# set home directory at initial login
authselect enable-feature with-mkhomedir
systemctl enable --now oddjobd
Validation of both idm clients with idm and AD user
Validate ssh into Ubuntu client with AD user "[email protected]"

Validate ssh into CentOS client with idm user "tina"
login as: tina
Keyboard-interactive authentication prompts from server:
| Password:
End of keyboard-interactive prompts from server
Last login: Sun Jul 14 20:48:42 2024 from 11.0.1.1
[tina@idm-client3-centos7 ~]$ id
uid=1240000004(tina) gid=1240000004(tina) groups=1240000004(tina)
context=unconfined_u:unconfined_r:unconfined_t:s0-s0:c0.c1023
Conclusion
Now we install Redhat IdM server and can enrol client hosts, set up AD trust, ssh and authenticate with both idm and AD users. IdM using Kerberos for authentication, together with user group, policy, HBAC and Sudo roles, provides a flexible and robust authentication framework that supports multiple authentication mechanisms, enabling organizations to authenticate users securely across their Linux and Unix environments.
More info can be found via Freeipa workshop, FreeIPA:FreeIPA trust AD, Red Hat product documentation, Redhat Idm on AWS with DNS forwarder, idmfreeipa DNS forwarder configurations on AWS, and Automating Red Hat Identity Management installation with Ansible.